
Deploying a Java Application on AWS Elastic Beanstalk with Custom Domain and SSL
Introduction
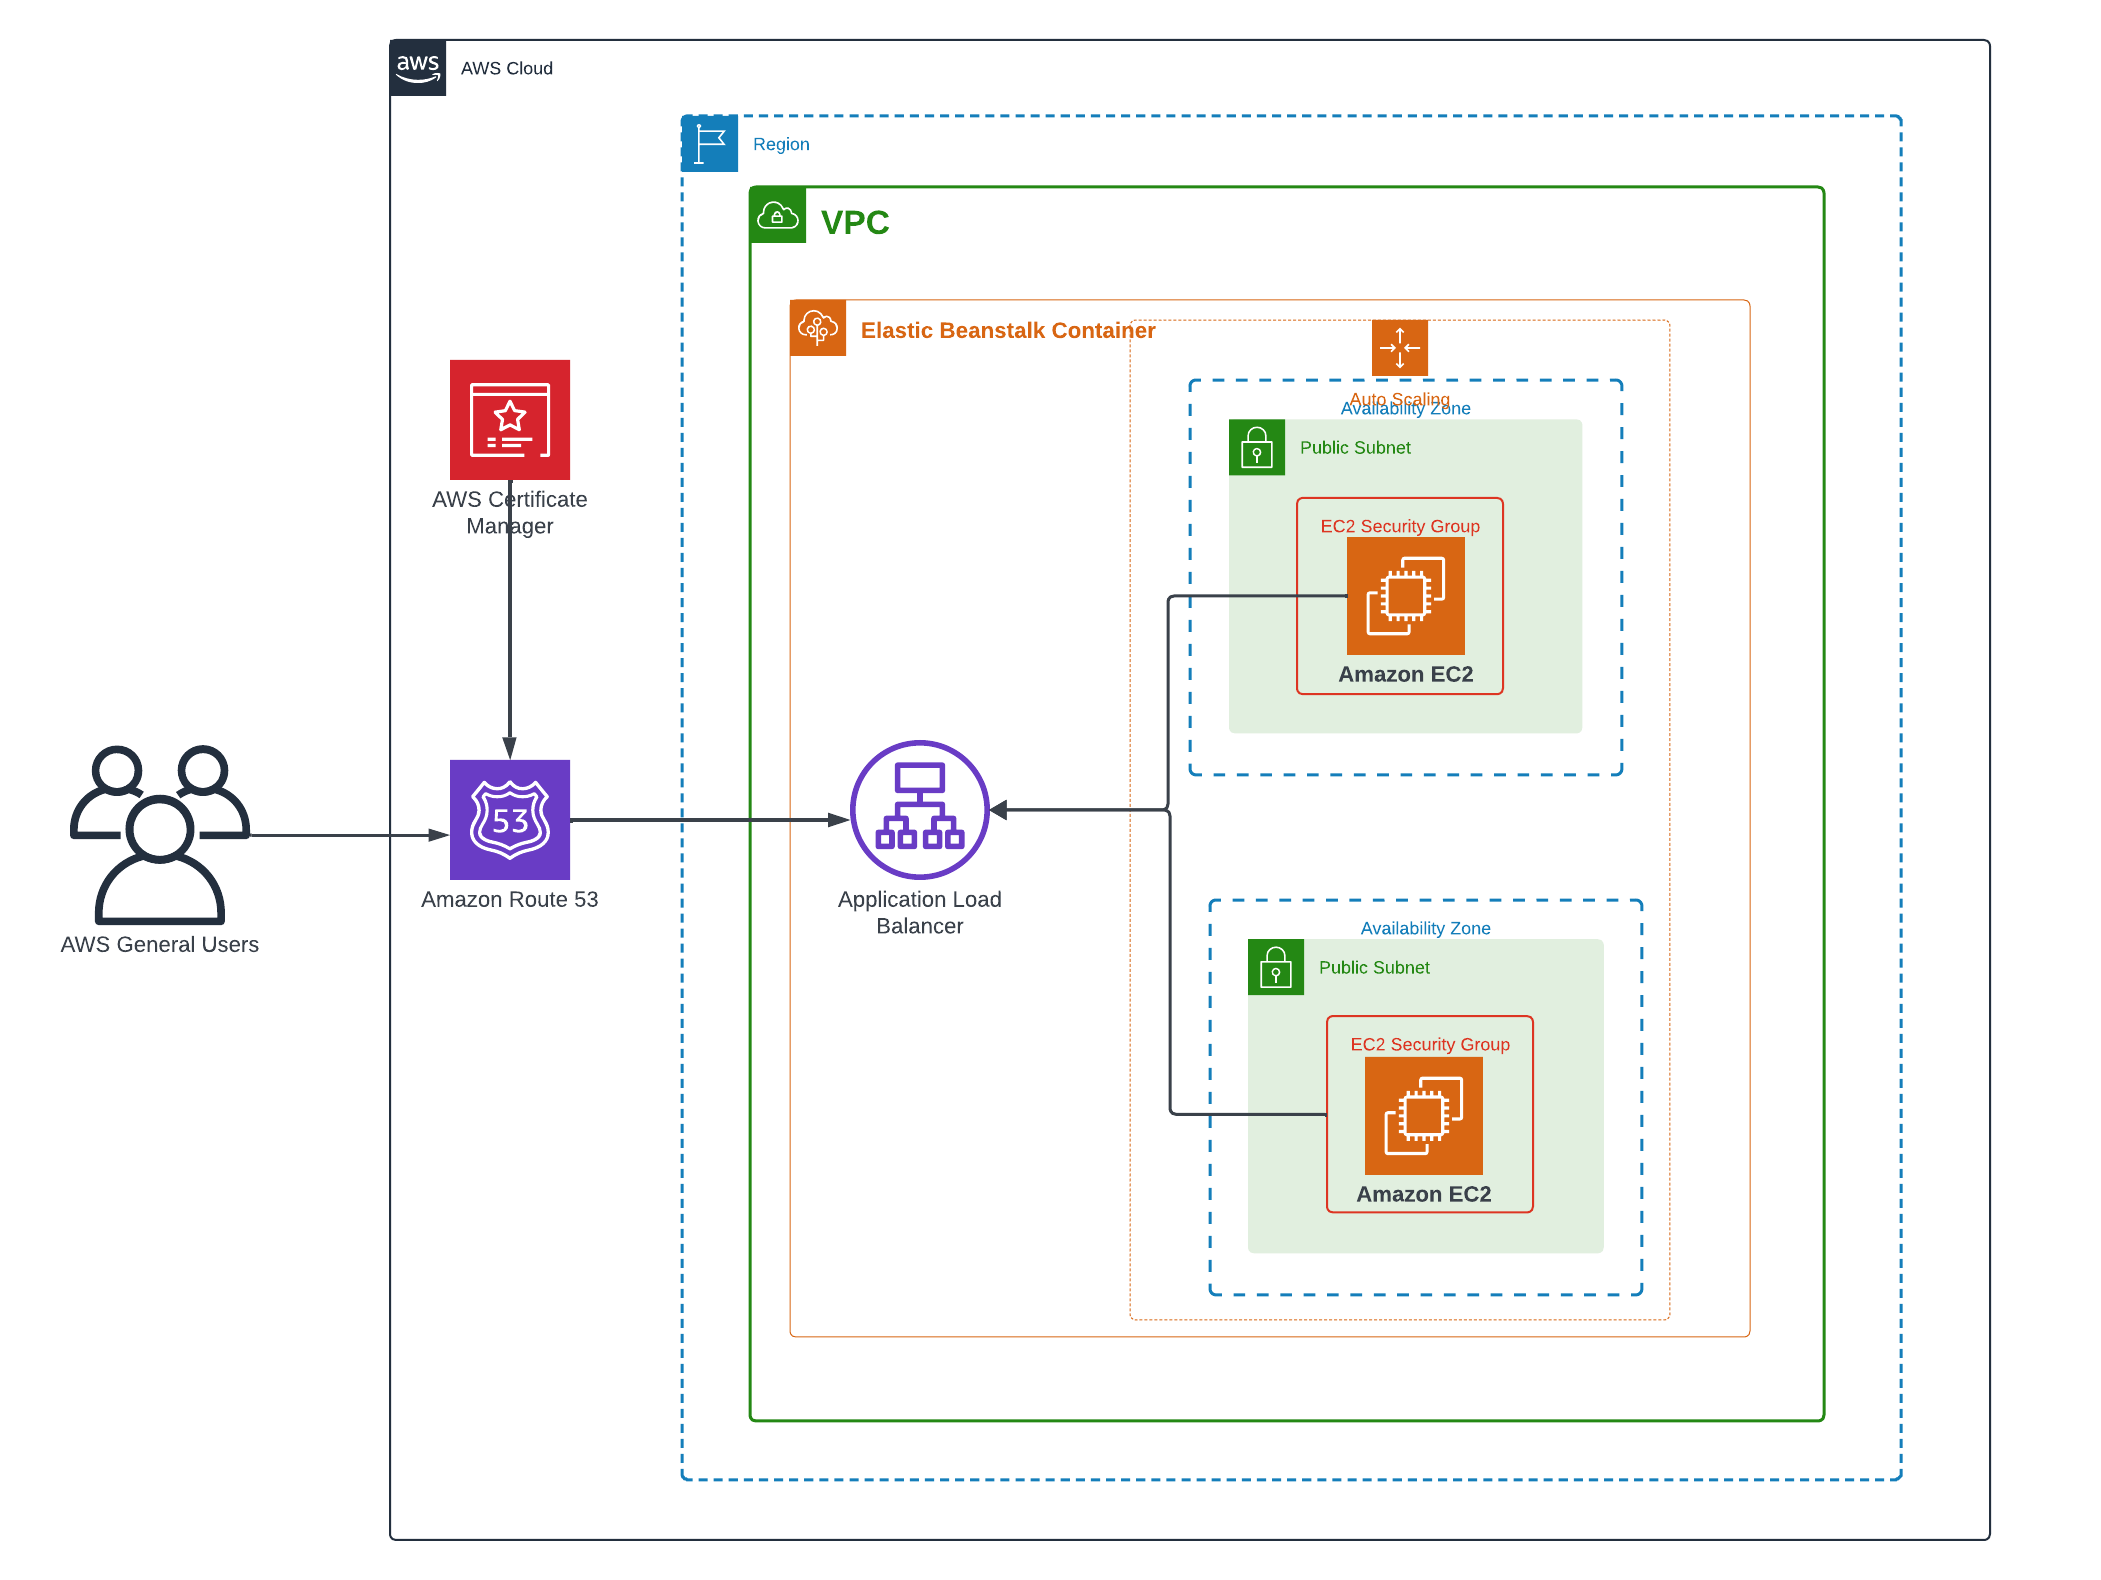
In this article, we will walk through the process of deploying a Java application on Amazon Web Services (AWS), utilizing several key services to create a secure and scalable environment. Our goal is to deploy a Java application on AWS Elastic Beanstalk, configure a custom domain with Amazon Route 53, and secure the application with an SSL certificate provided by AWS Certificate Manager. By the end of this guide, you will have a fully functional and secure Java application accessible over the internet with your custom domain.
AWS Services Overview
To successfully deploy and secure your Java application on AWS, we’ll leverage three key services: Elastic Beanstalk, Route 53, and Certificate Manager. Each of these services plays a crucial role in the deployment process, offering powerful tools to manage, scale, and secure your application.
Elastic Beanstalk
AWS Elastic Beanstalk is a fully managed service that simplifies the process of deploying and managing applications in the cloud. With Elastic Beanstalk, you can easily deploy your Java application without worrying about the underlying infrastructure. Elastic Beanstalk automatically handles the provisioning of resources such as EC2 instances, load balancers, and scaling configurations, allowing you to focus on writing and improving your code.
Elastic Beanstalk supports a wide range of programming languages, including Java, and offers built-in support for popular application servers like Apache Tomcat. You can deploy your application through the AWS Management Console, AWS CLI, or even through continuous integration and deployment pipelines. This service is designed to help you get your application up and running quickly while also providing flexibility and control over your environment.
Route 53
Amazon Route 53 is AWS’s scalable and highly available Domain Name System (DNS) web service. It’s designed to route end-user requests to your application by translating human-readable domain names (like www.kemanedonfack.com) into the IP addresses needed to access AWS resources. Route 53 not only handles domain name registration and DNS routing but also offers advanced features like health checks, DNS failover, and traffic management across multiple regions.
In this guide, Route 53 will be used to create a hosted zone for your domain and configure DNS records to direct traffic to your Elastic Beanstalk environment.
AWS Certificate Manager
AWS Certificate Manager (ACM) is a service that simplifies the process of managing SSL/TLS certificates for your AWS-based websites and applications. SSL/TLS certificates are essential for securing the data transmitted between your users and your application, providing encryption and ensuring the integrity of the data.
With ACM, you can easily request, deploy, and manage SSL certificates at no extra cost. These certificates can be automatically renewed, reducing the administrative burden and ensuring continuous protection for your application. In this guide, we’ll use ACM to request an SSL certificate for your custom domain and associate it with your Elastic Beanstalk environment, ensuring that your application is securely served over HTTPS.
Prerequisites
- AWS Account: Ensure you have an active AWS account. If you don’t have one, sign up at aws.amazon.com.
- Java Application: Prepare a deployable Java application (WAR or JAR file) that’s ready for deployment.
- Domain Name: Obtain a registered domain name. You can register one via Route 53 or another domain registrar.
Deploying the Java Application on Elastic Beanstalk
Now that we have our Java application ready, let’s deploy it on AWS Elastic Beanstalk. This process involves creating an Elastic Beanstalk environment, configuring the application, and deploying the code.
Creating the Elastic Beanstalk Environment
- Log in to your AWS Management Console and navigate to the Elastic Beanstalk service.
- On the Elastic Beanstalk dashboard, click on
Create application.

- In the
Configure environmentpage:- Choose
Web server environmentas the Environment tier. - Give your application a name (e.g., spring-app).
- For the Environment name, you can use the auto-generated name or create a custom one.
- Choose
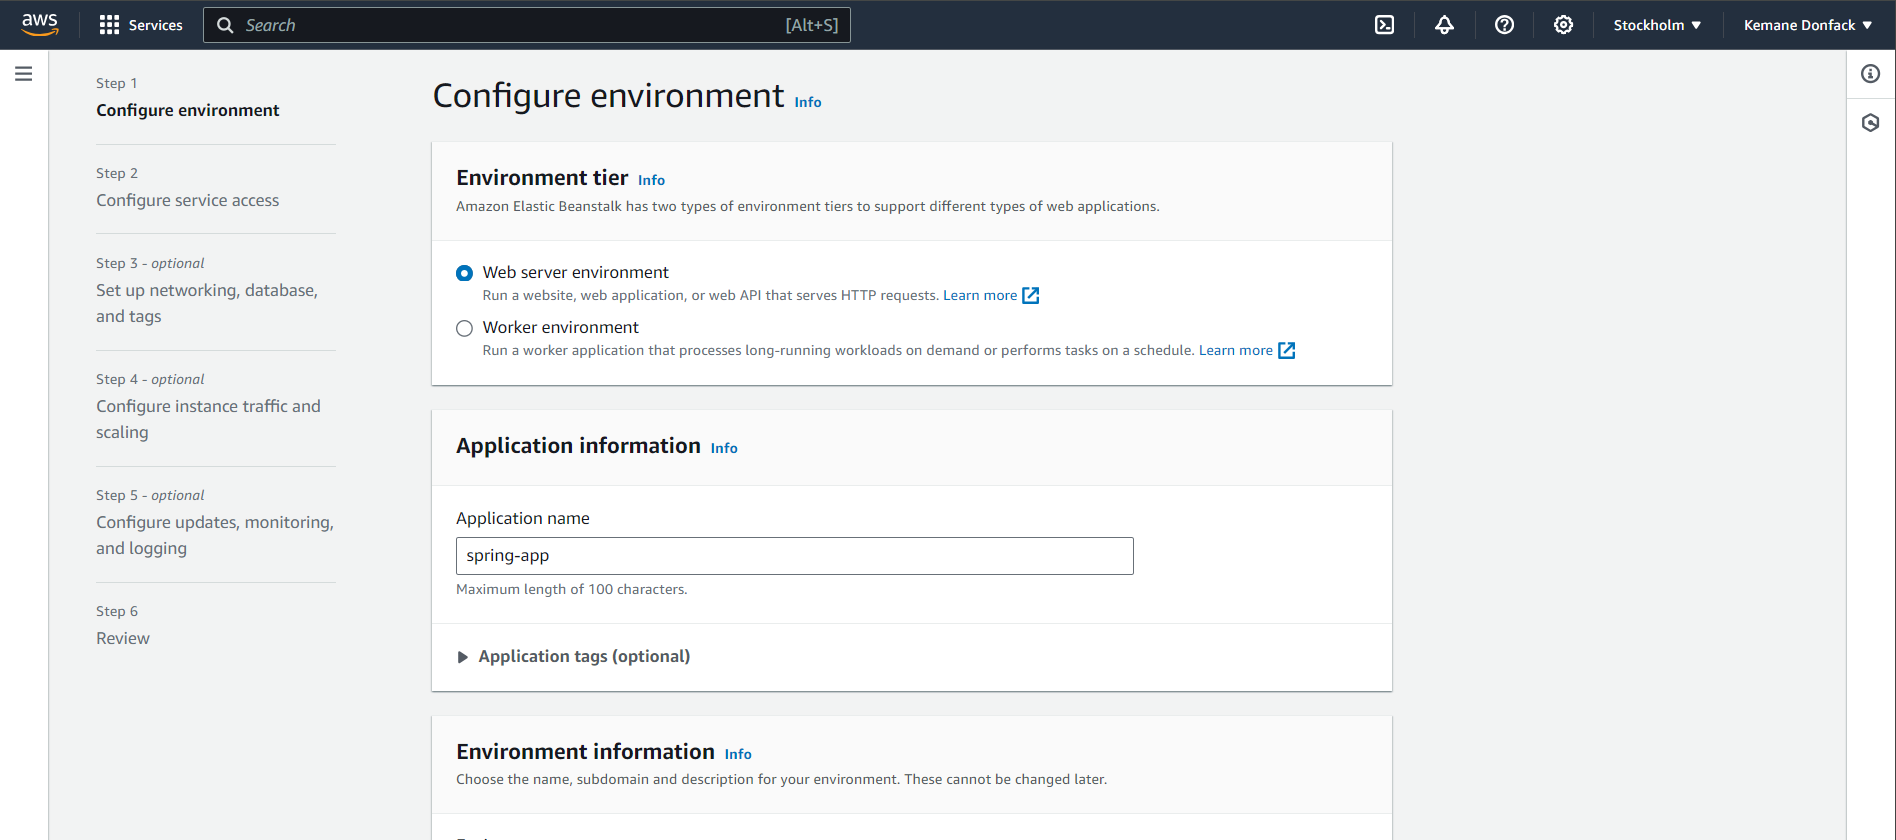
- Under Platform, select the appropriate platform for your Java application. In this case, we’re using Corretto 11 running on 64bit Amazon Linux 2.
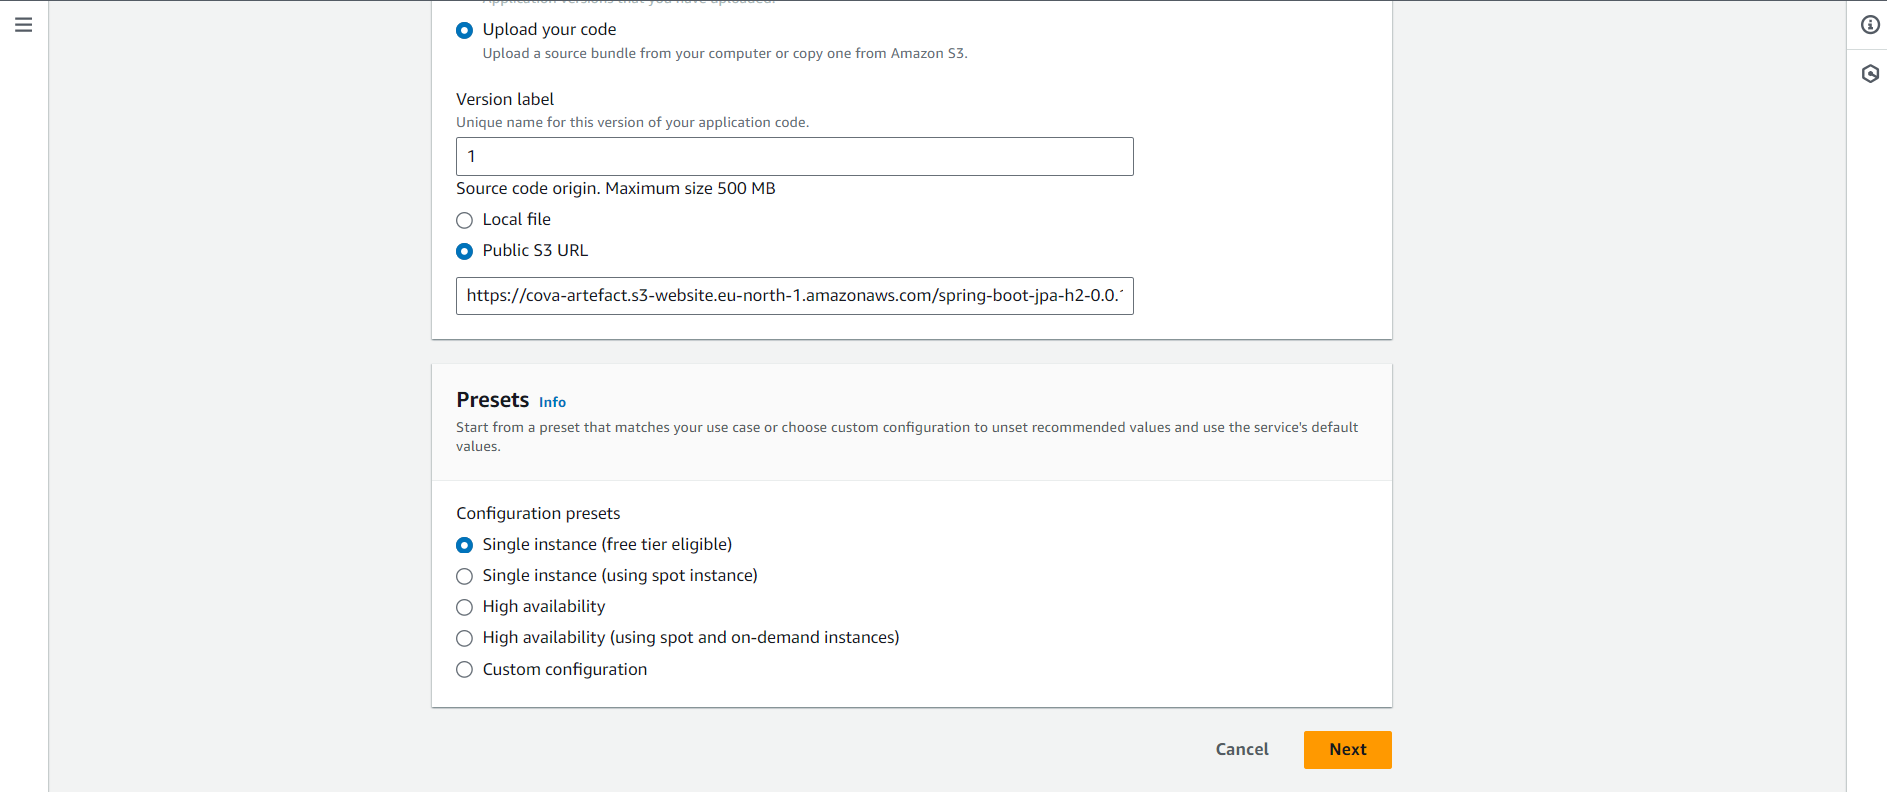
- For
Application code, chooseUpload your code. You can either upload a local file or provide a public S3 URL. In our example, we’re using a public S3 URL.
Configuring the Application
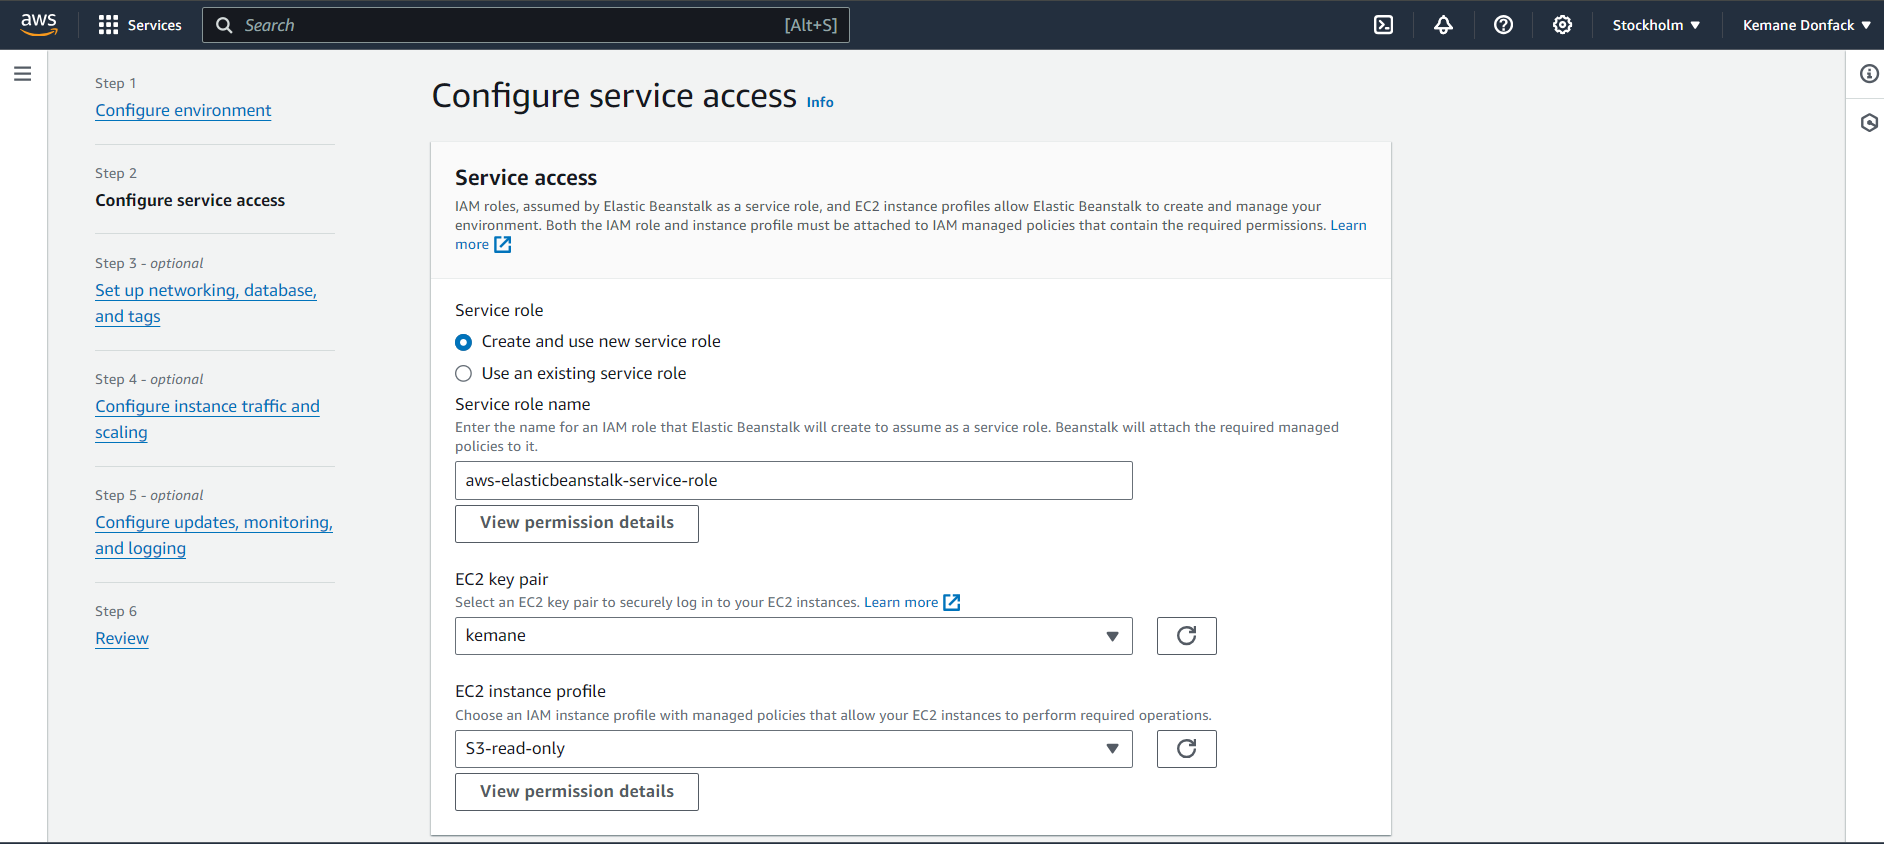
- In the Configure service access section, you can create or choose an existing service role and EC2 instance profile. For beginners, it’s often easiest to let Elastic Beanstalk create these for you.
- The subsequent pages allow you to configure more advanced options such as VPC settings, database options, and tags. For a basic deployment, you can leave these at their default values.
- On the Configure instance traffic and scaling page, choose the
Single instancepreset for a simple, cost-effective setup.
Deploying the Code
- Review all your settings on the final page. This is your last chance to make any changes before creating the environment.
- If everything looks correct, click on Submit to create your environment and deploy your application.
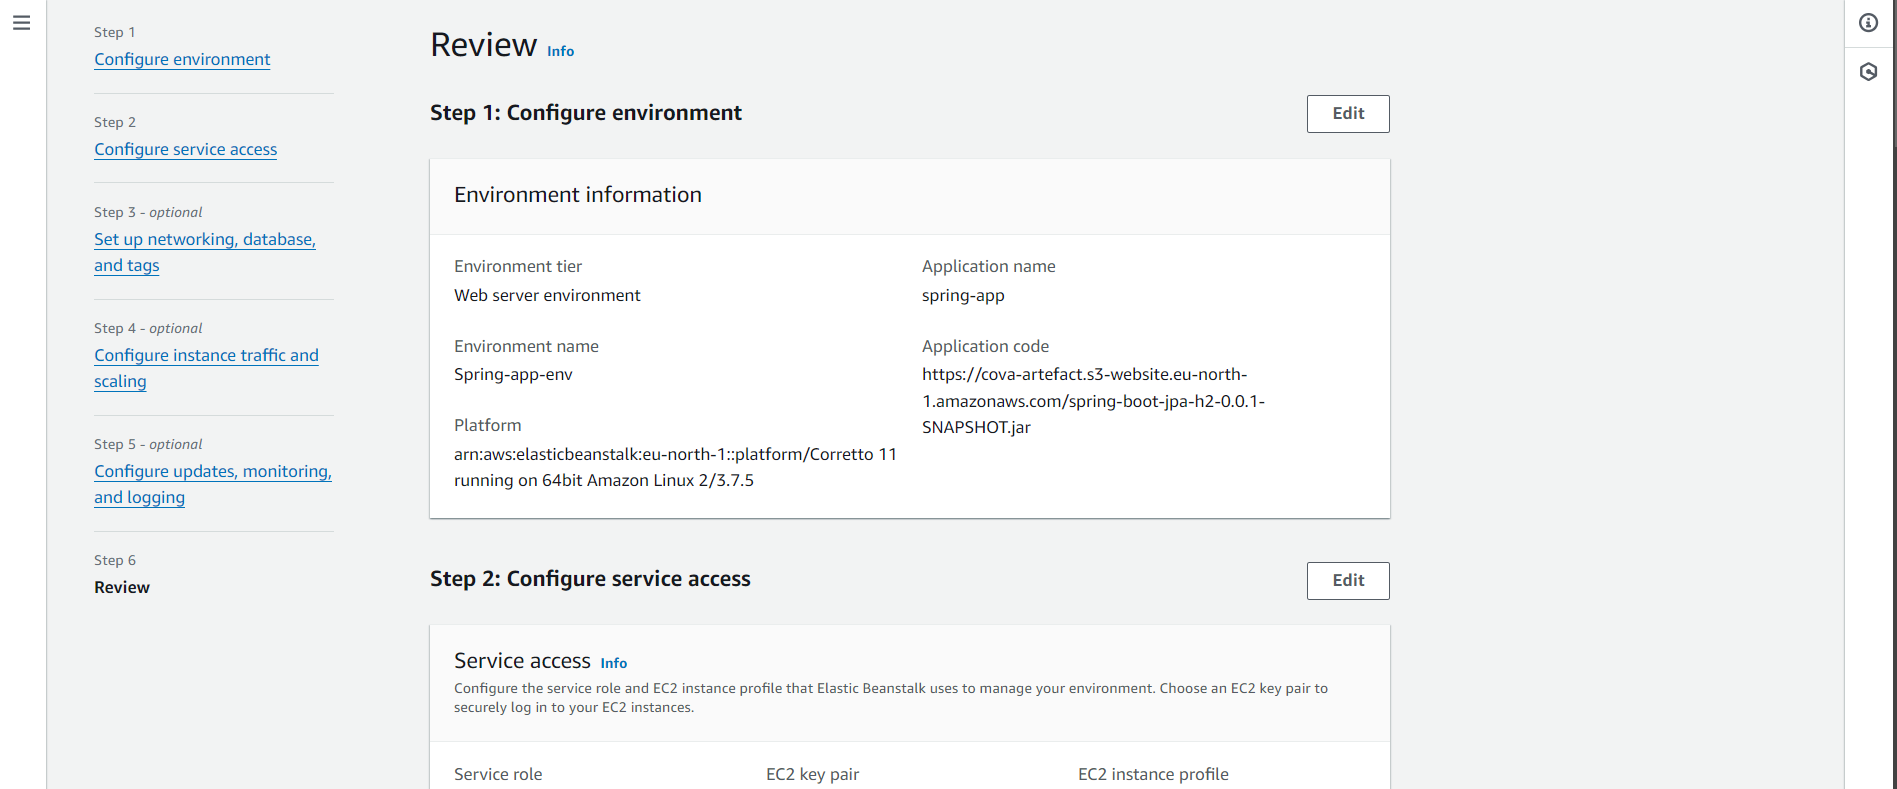
- Once the deployment is complete, you’ll see a success message, and Elastic Beanstalk will provide you with a URL where you can access your application.
- Click on the provided URL to view your deployed Java application.
Congratulations! You’ve successfully deployed your Java application on AWS Elastic Beanstalk. The application is now accessible via the Elastic Beanstalk URL.
Configuring a Custom Domain Name with Route 53
After successfully deploying your Java application on Elastic Beanstalk, the next step is to configure a custom domain name using Amazon Route 53.
Creating a Hosted Zone in Route 53
- Log in to your AWS Management Console and navigate to the
Route 53service. - In the Route 53 dashboard, click on Hosted zones in the left sidebar.
- If you haven’t already created a hosted zone for your domain, click on
Create hosted zone. - Enter your domain name (e.g., kemanedonfack.com) and click
Create.
Once created, you’ll see a screen similar to the one below, showing your hosted zone details:
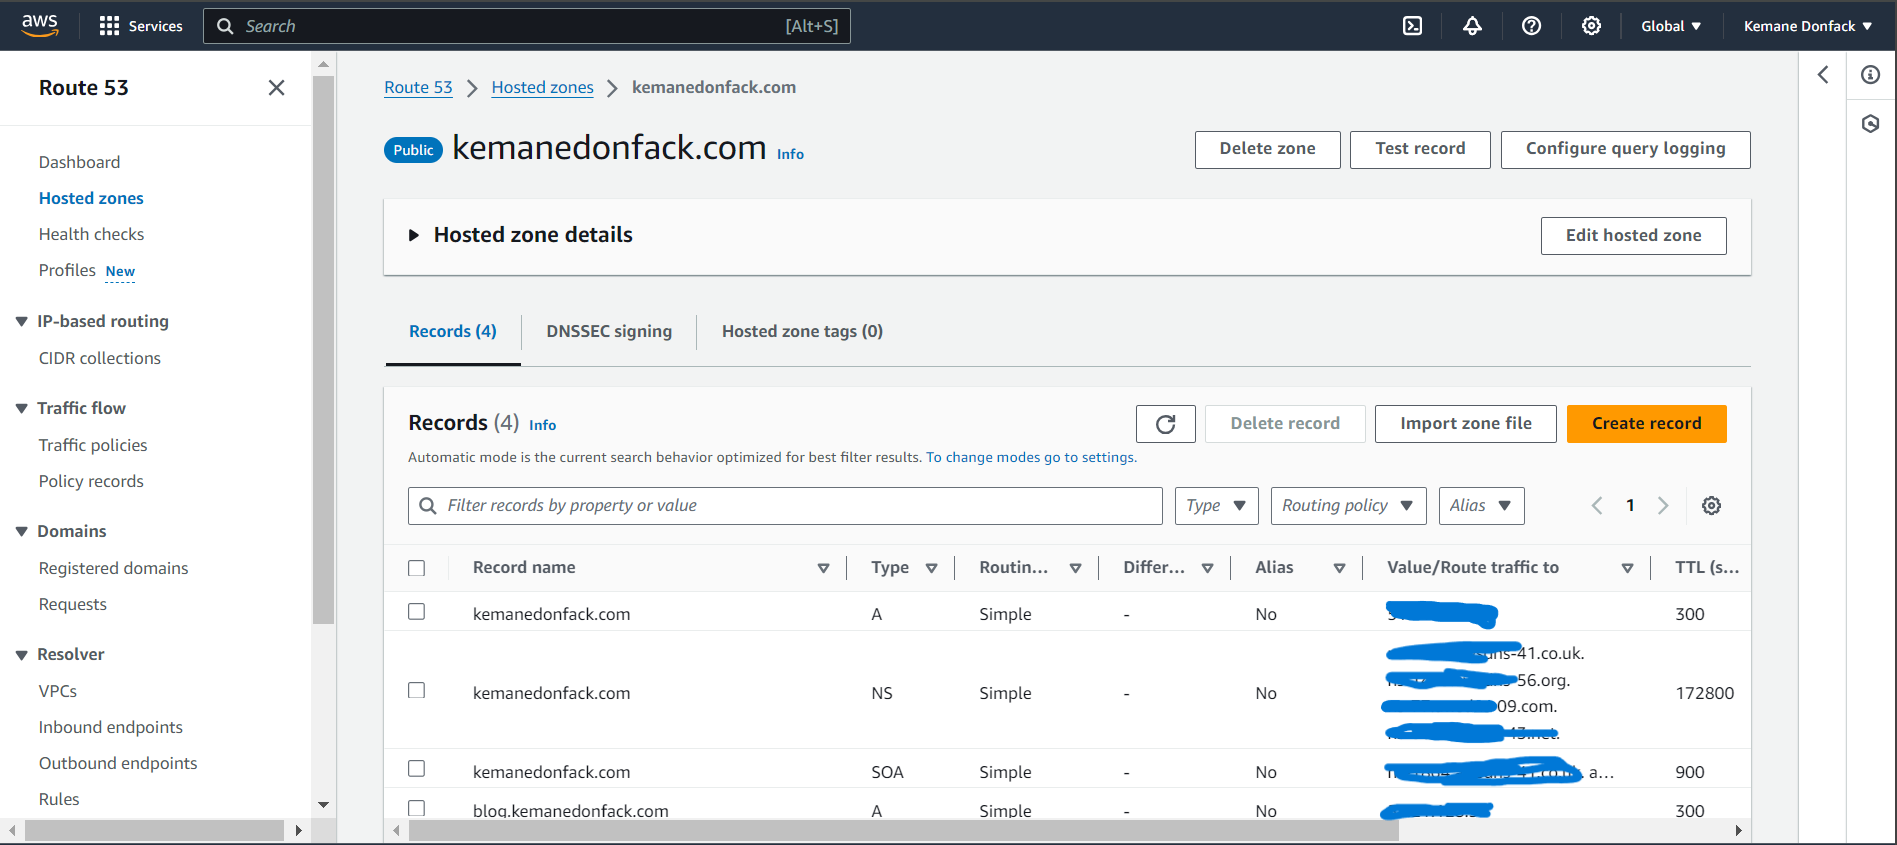
This screen displays the existing DNS records for your domain.
Configuring DNS Records
Now that your hosted zone is set up, you need to create a new record to point your custom domain to your Elastic Beanstalk application.
- In your hosted zone, click on Create record.
- Fill in the details as follows:
- Record name: Enter the subdomain you want to use (e.g.,
spring-appfor spring-app.kemanedonfack.com) - Toggle on the
Aliasoption. - Route traffic to: Select
Alias to Elastic Beanstalk environment. - Choose your region and select your Elastic Beanstalk environment URL.
- Routing policy: Keep it as
Simple routing.
- Record name: Enter the subdomain you want to use (e.g.,
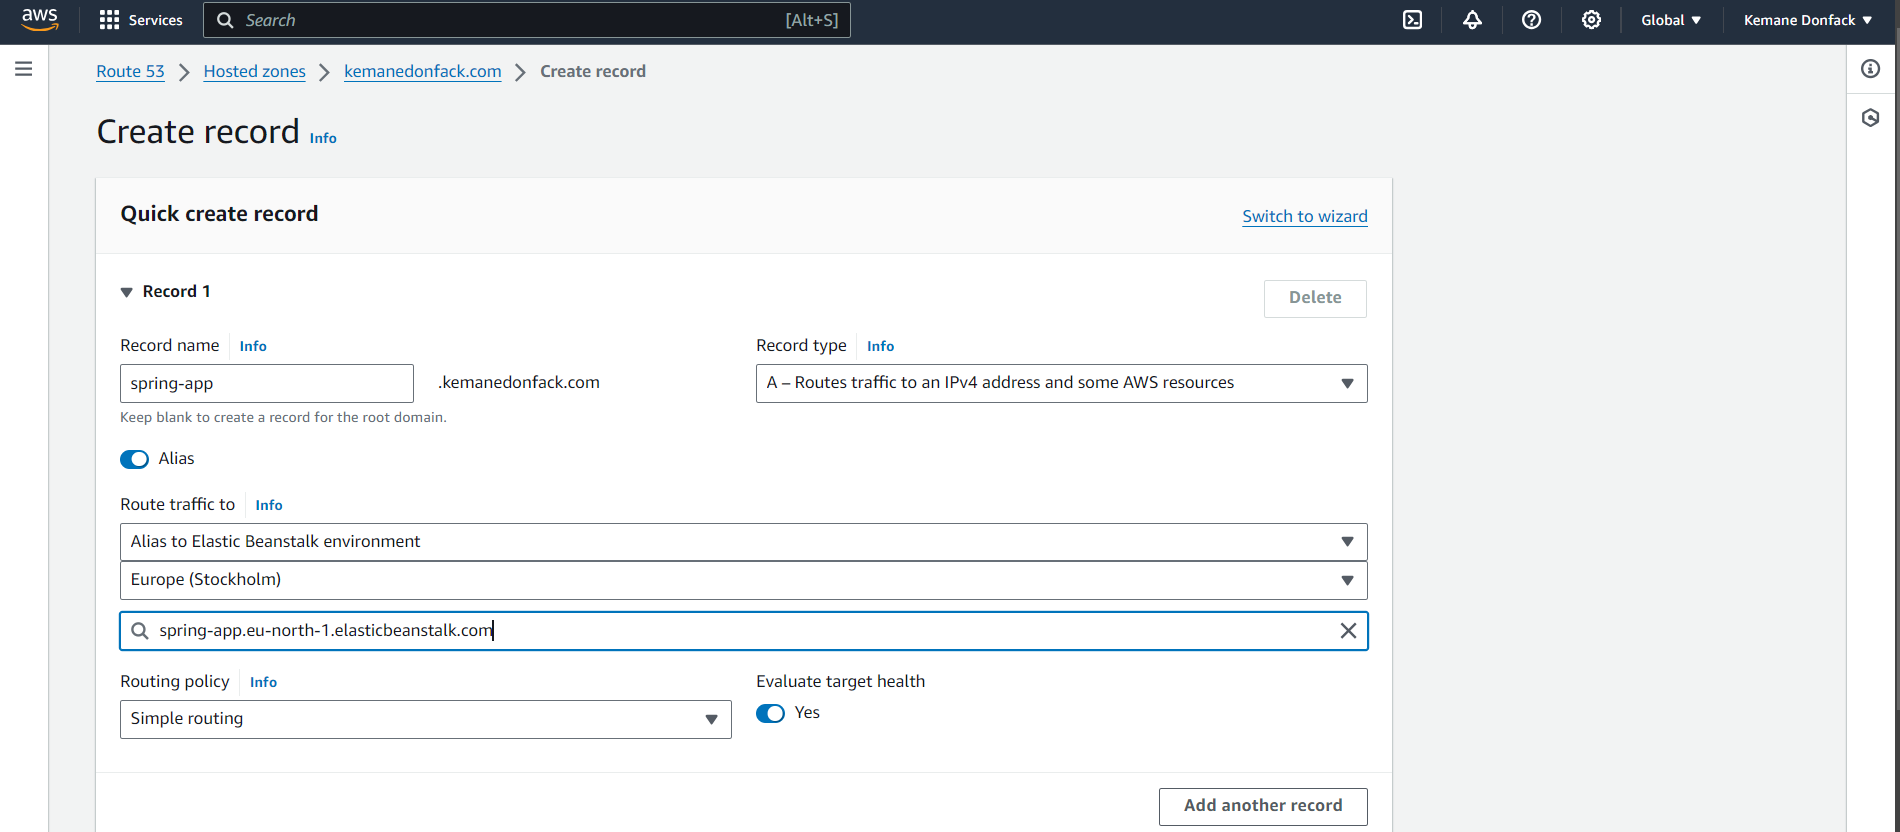
- Click
Create recordsto add this new DNS record.
Verifying Domain Setup
To verify that your domain is correctly set up:
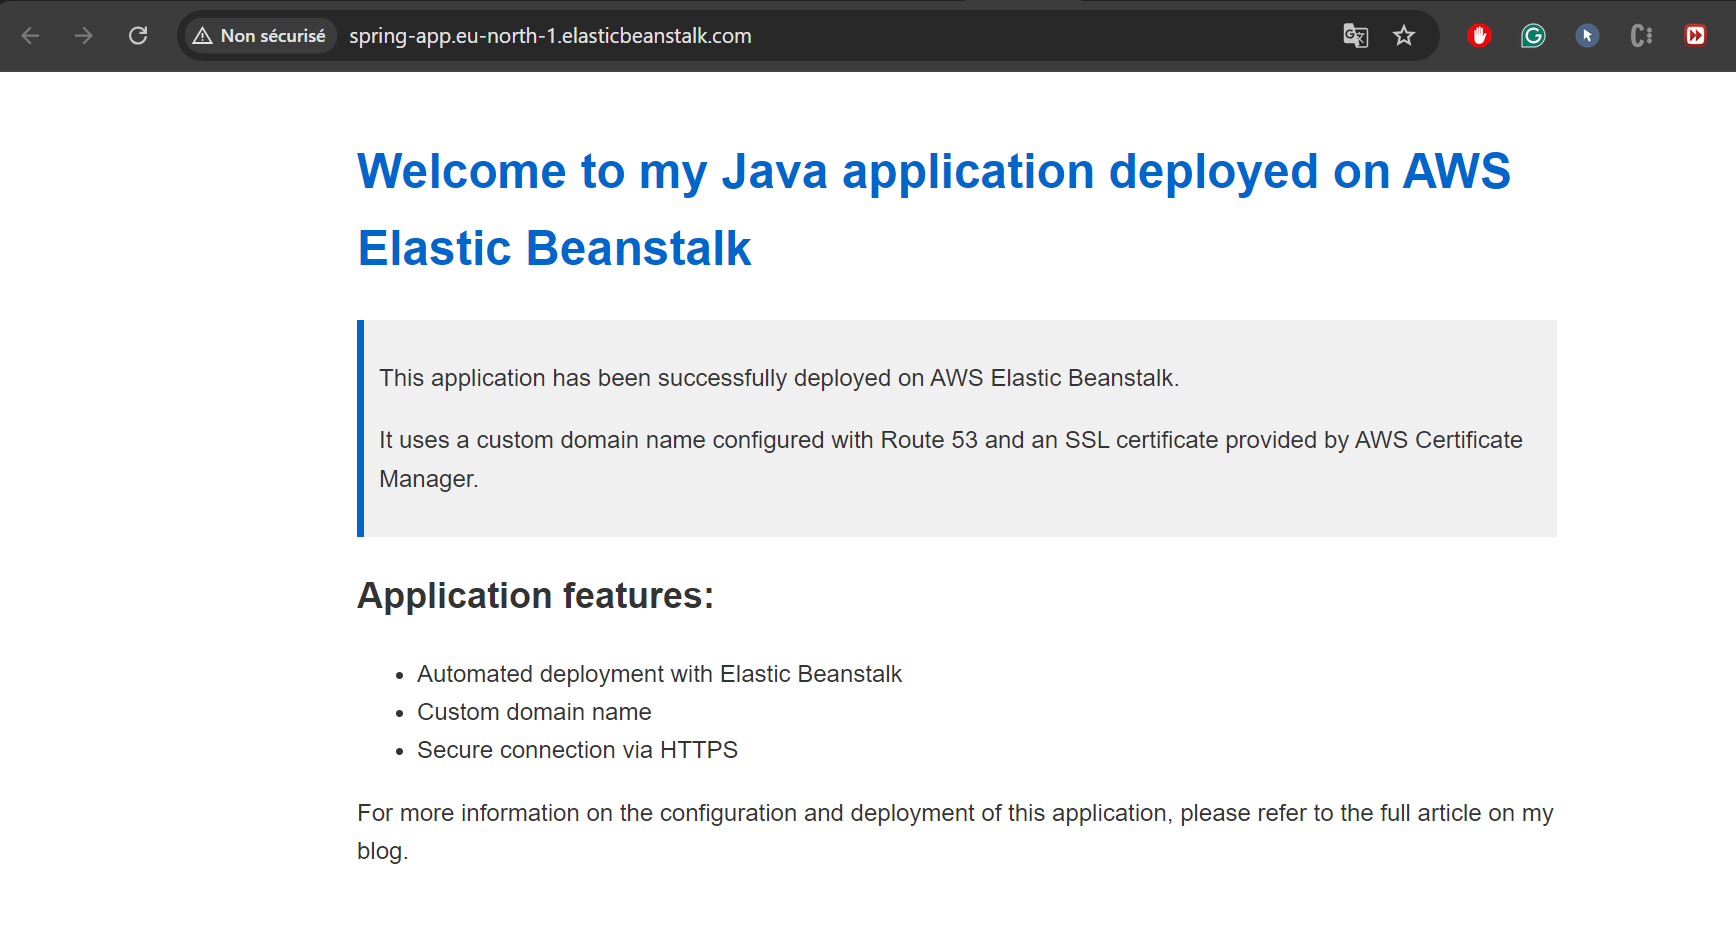
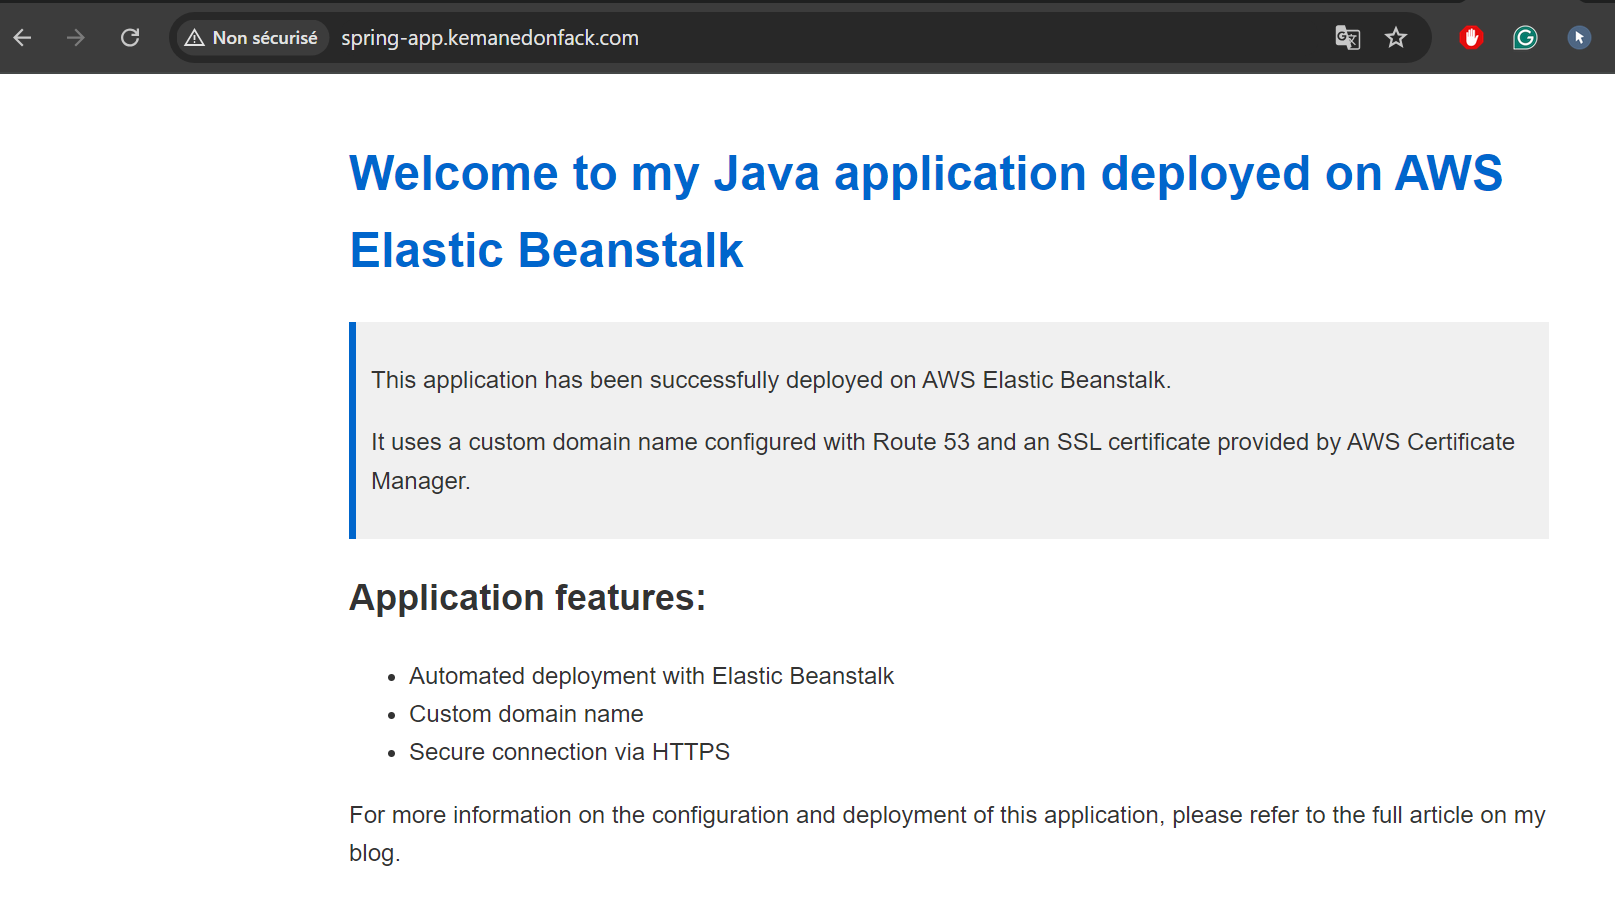
- Open a new browser tab and enter your custom domain (e.g., spring-app.kemanedonfack.com).
Adding an SSL Certificate with AWS Certificate Manager
Securing your Java application with SSL/TLS is a crucial step to protect data transmitted between your users and your application.
Requesting an SSL Certificate
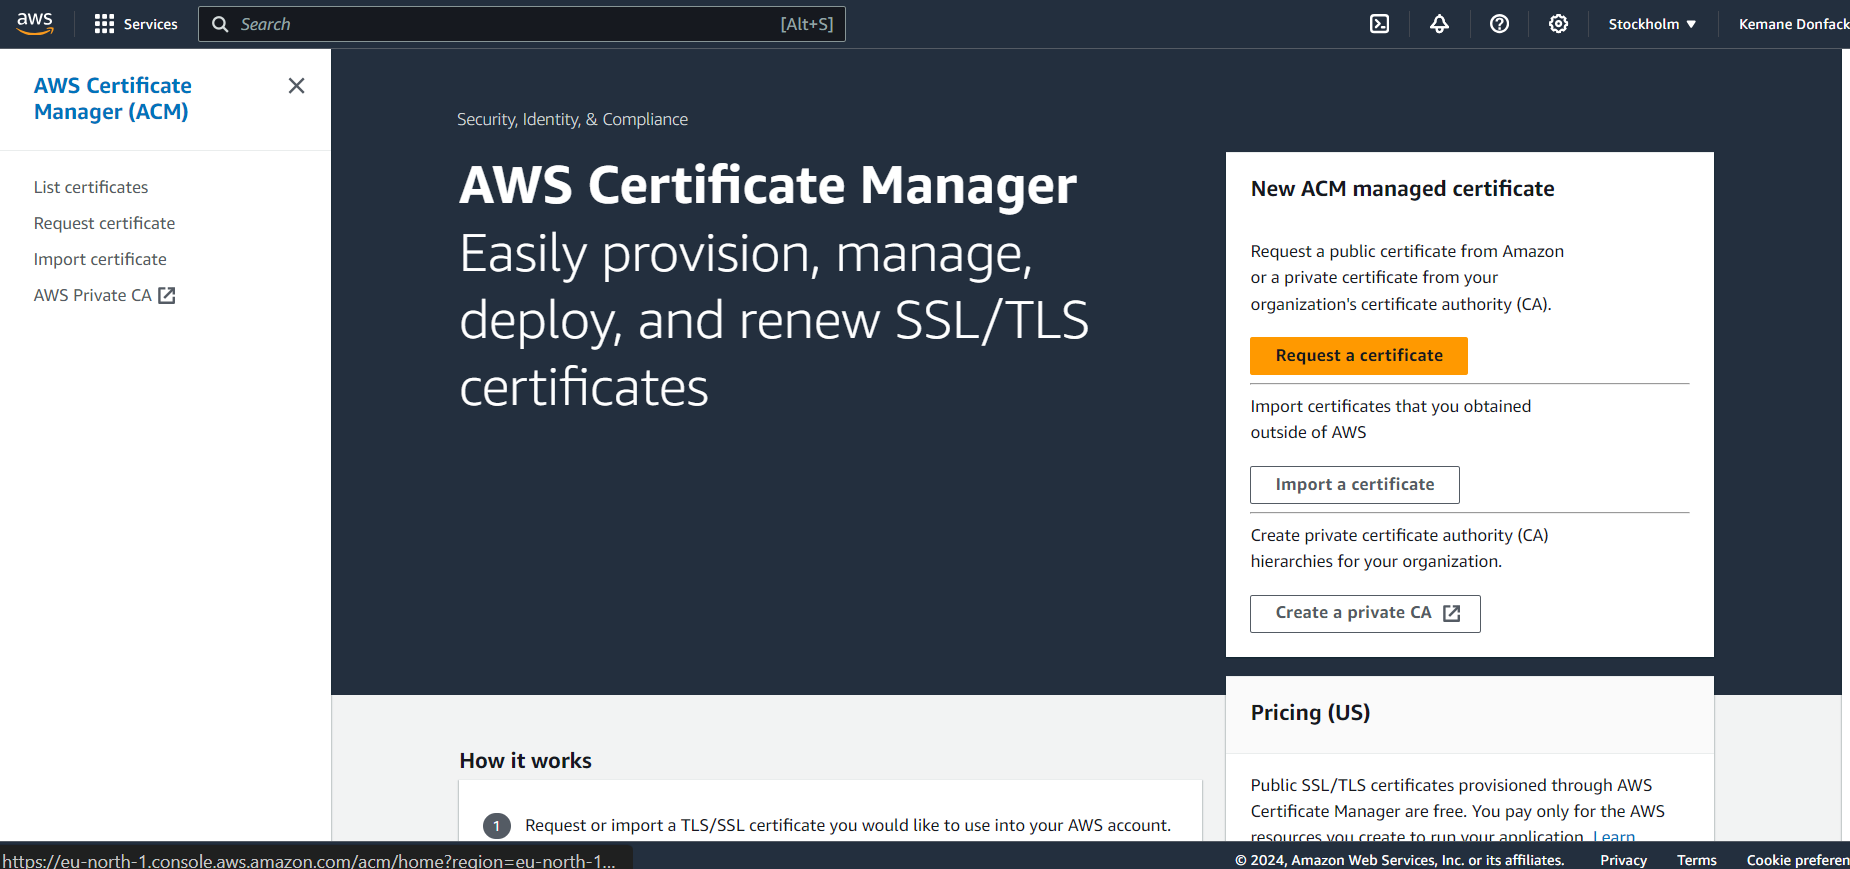
- Navigate to AWS Certificate Manager (ACM): Log in to your AWS Management Console and search for "Certificate Manager" in the search bar.
-
Request a Certificate:
- In the ACM dashboard, click on
Request a certificate. - Choose
Request a public certificateand clickNext.
- In the ACM dashboard, click on
-
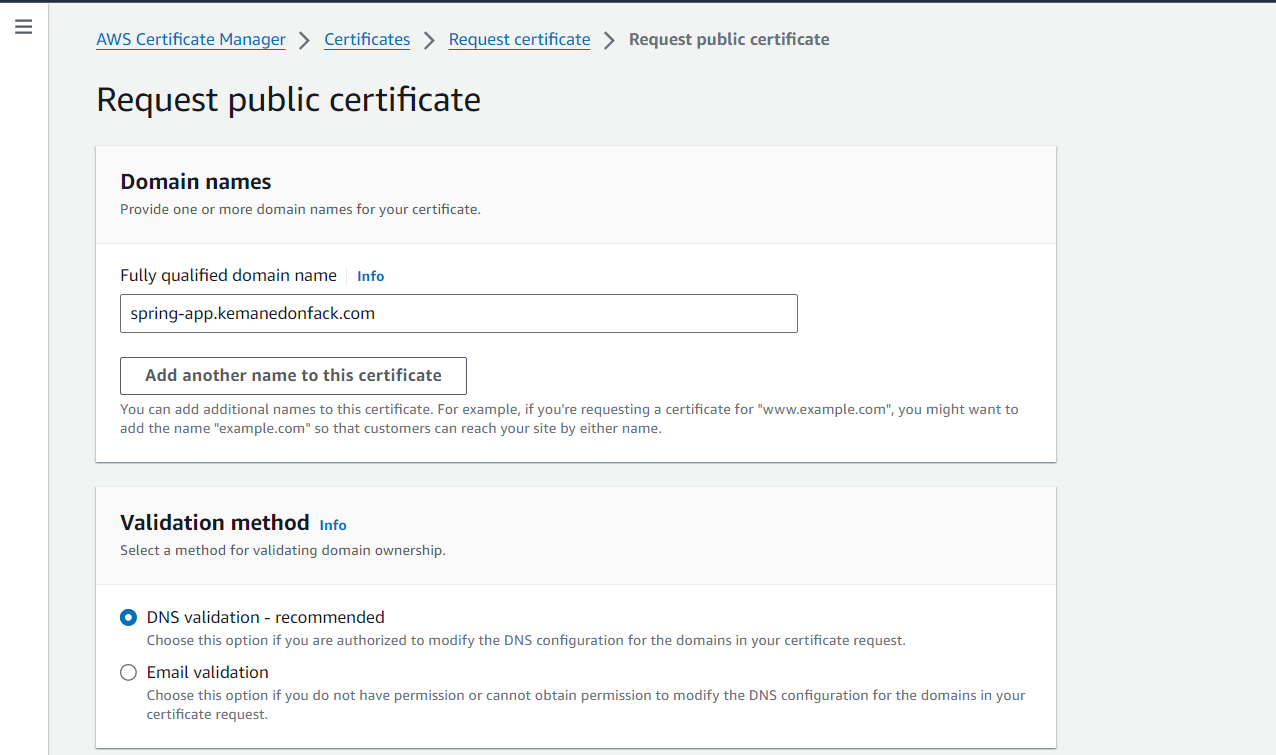
Enter Your Domain Name:
- In the Domain names section, enter your custom domain name (e.g.,
spring-app.kemanedonfack.com). - If you plan to use multiple subdomains, you can include a wildcard domain (e.g.,
*.kemanedonfack.com).
- In the Domain names section, enter your custom domain name (e.g.,
-
Select Validation Method:
- Choose DNS validation as it’s easier and more commonly used. ACM will provide a CNAME record that you’ll add
to your Route 53 hosted zone.
-
Add CNAME Record:
- In the Route 53 dashboard, go to your hosted zone and click on
Create record. - Choose CNAME as the record type and enter the details provided by ACM.
- In the Route 53 dashboard, go to your hosted zone and click on

-
Once the DNS record is added, ACM will automatically validate your domain. This process may take a few minutes.
-
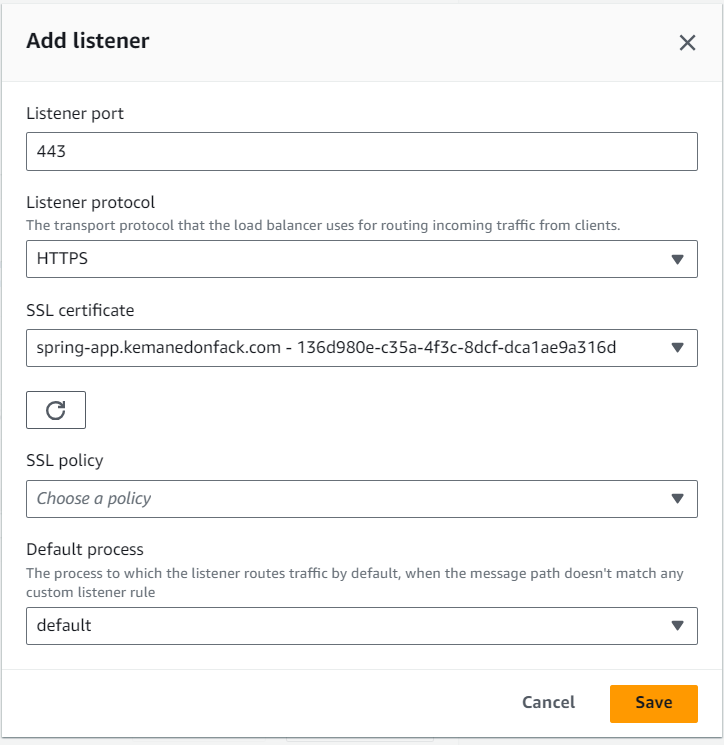
Deploy the SSL Certificate to Elastic Beanstalk:
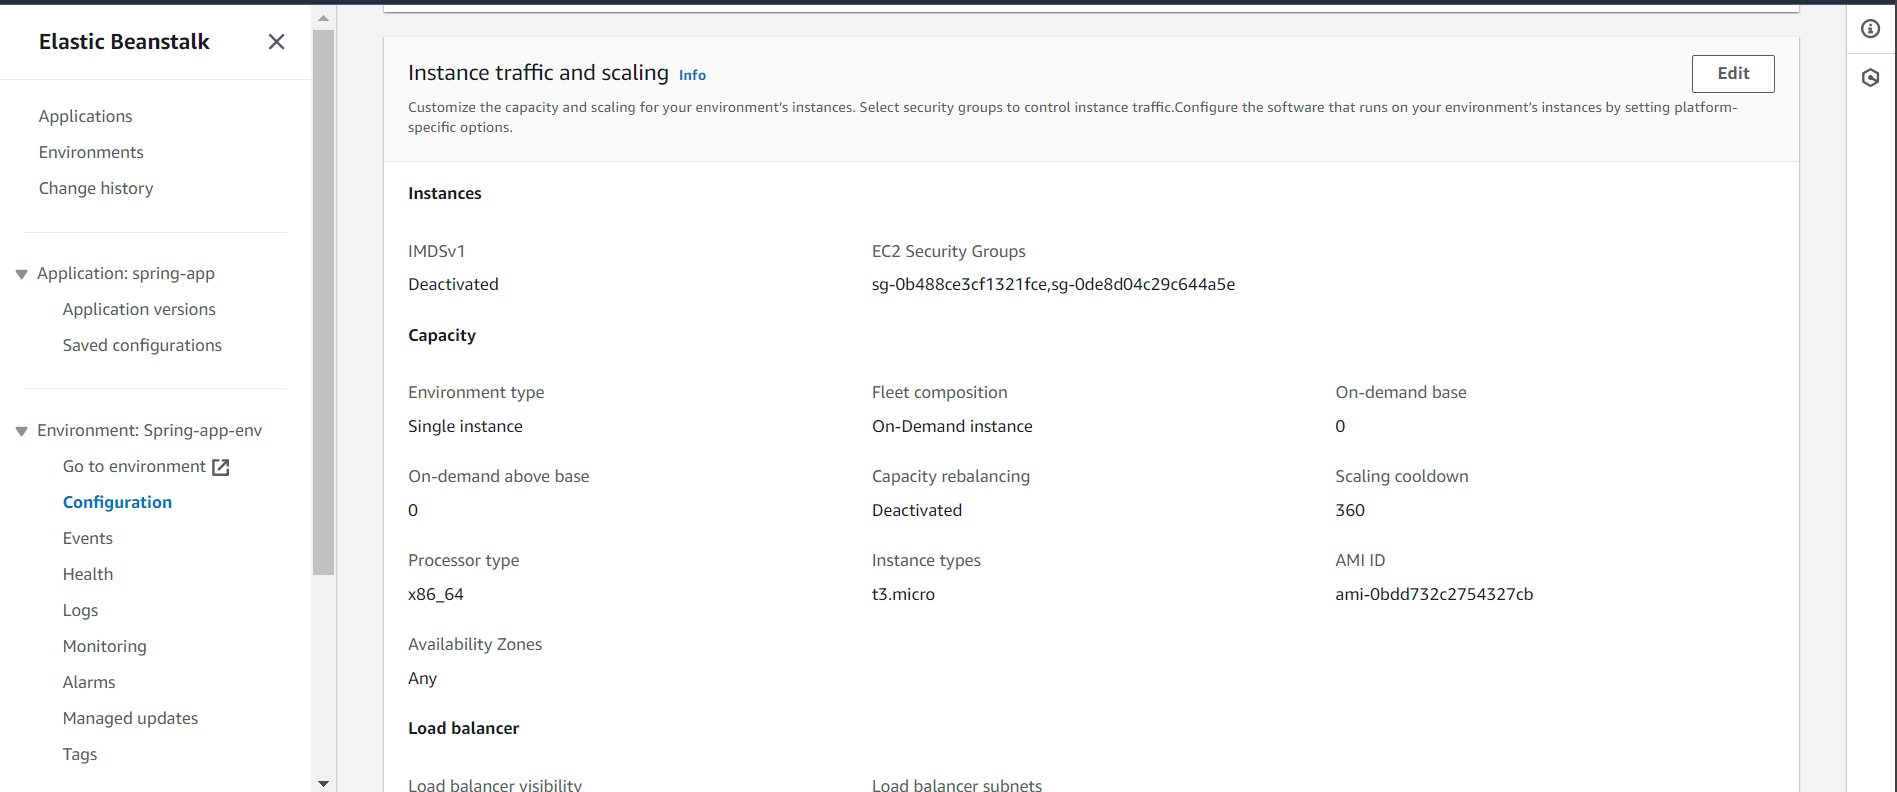
- After validation, return to your Elastic Beanstalk environment settings.
- Under the Load balancer configuration, select the SSL certificate from ACM.
- Save your changes and wait for Elastic Beanstalk to deploy the updated configuration.
Testing the SSL Connection
Finally, verify that your Java application is secured with SSL:
- Open your custom domain in a browser, and check for the padlock icon indicating a secure HTTPS connection.
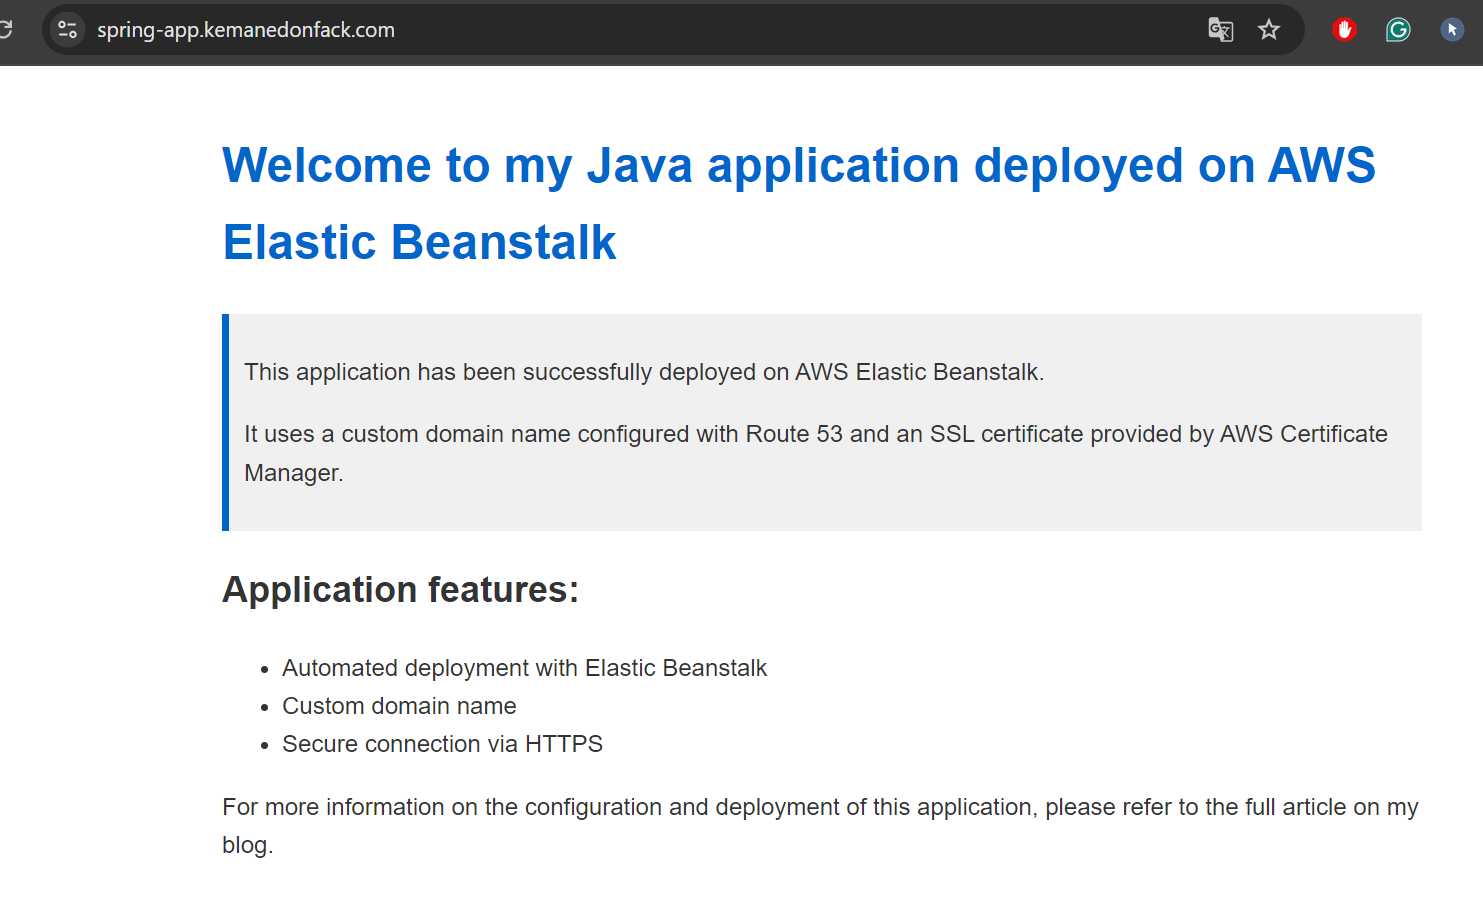
Your Java application is now securely deployed on AWS with a custom domain name and SSL certificate.
Conclusion
Congratulations! You have successfully deployed a Java application on AWS Elastic Beanstalk, configured a custom domain with Amazon Route 53, and secured the application with an SSL certificate using AWS Certificate Manager. This deployment not only enhances your application’s accessibility and branding but also ensures that data transmission between your users and your application is secure.
With this foundational knowledge, you’re now equipped to scale your application, optimize its performance, and explore more advanced AWS features. The cloud is a vast landscape full of opportunities, and you’re just getting started. Happy coding!
Leave a Reply