
Auto Scaling Group on AWS with Terraform
This article was originally written by “Kemane Donfack” on the blog: https://blog.numericaideas.com/auto-scaling-group-on-aws-with-terraform
Introduction
In today’s digital landscape, building highly available and scalable infrastructures is crucial for ensuring the reliability and performance of applications. Amazon Web Services (AWS) provides a comprehensive suite of cloud services that enable organizations to build resilient and elastic environments. In this article, we will explore how to set up a highly available infrastructure on AWS using Terraform, a popular infrastructure-as-code tool.
Auto Scaling Group (ASG)
Before we dive into the deployment of our infrastructure, let’s take a moment to understand the concept of an Auto Scaling Group (ASG) and its role in ensuring the availability and scalability of our applications.
What is an Auto Scaling Group?
An Auto Scaling Group is a fundamental component of AWS that allows you to automatically adjust the number of instances based on demand. It helps maintain application availability, distribute traffic evenly, and optimize resource utilization.
When you configure an Auto Scaling Group, you define parameters such as the minimum and maximum number of instances to keep running, desired capacity, and scaling policies. AWS then automatically manages the instances, launching new ones or terminating existing ones as needed, based on the defined policies.
How Does Auto Scaling Work?
Auto Scaling uses metrics and policies to determine when to scale the number of instances. Metrics can include CPU utilization, network traffic, or custom metrics from Amazon CloudWatch. Based on these metrics, you can define scaling policies that specify how and when the Auto Scaling Group should add or remove instances.
For example, you can set a scaling policy to add instances when CPU utilization exceeds a certain threshold and remove instances when it drops below a specific level. This dynamic scaling capability ensures that your applications can handle varying levels of traffic and resource demands, while also optimizing costs.
The Role and Importance of Auto Scaling Group
The Auto Scaling Group plays a crucial role in building resilient and elastic environments. Here’s why it is essential:
- High Availability: By distributing instances across multiple availability zones, the Auto Scaling Group ensures that if one zone becomes unavailable, your applications can continue running on instances in other zones. This helps minimize downtime and provides resilience against infrastructure failures.
- Scalability: The Auto Scaling Group allows your infrastructure to scale out or in automatically based on demand. As traffic increases, the group adds more instances to handle the load, ensuring that your applications remain responsive and performant. Conversely, during periods of low demand, instances are scaled in to optimize resource utilization and reduce costs.
- Fault Tolerance: If an instance within the Auto Scaling Group fails, the group automatically replaces it with a new instance. This self-healing capability helps maintain application availability and reduces the need for manual intervention.
By incorporating the Auto Scaling Group into our infrastructure, we can achieve a resilient and elastic environment that can handle fluctuations in traffic and resource demands effectively.
Infrastructure Provisioning
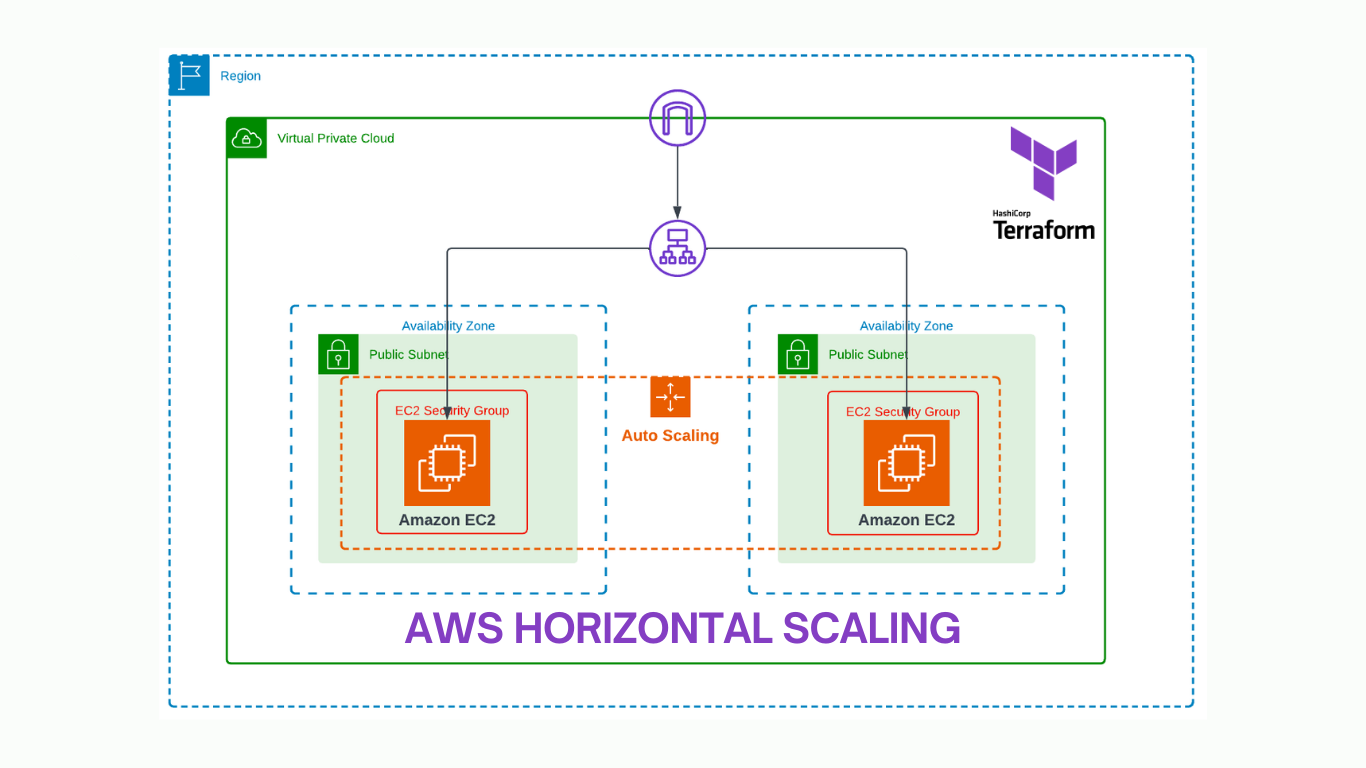
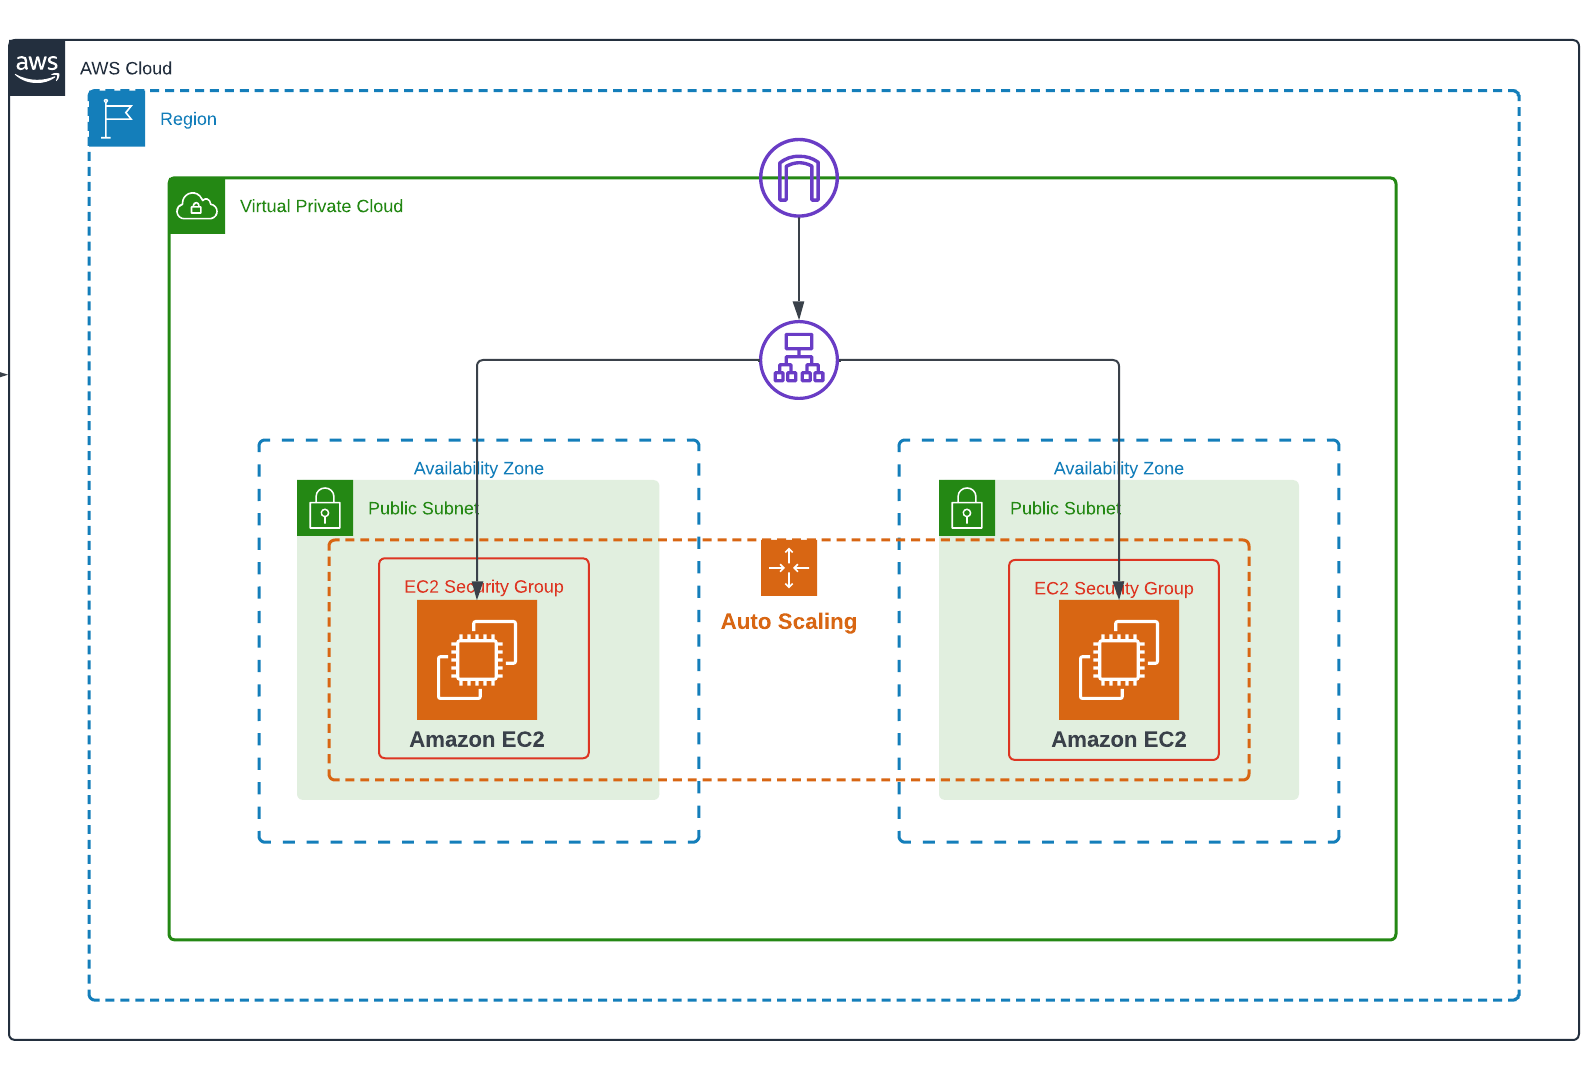
The overall architecture looks like the following image in which the AWS Cloud Services are highlighted:
Prerequisites
Before we begin, make sure you have the following prerequisites in place:
- An AWS account with appropriate permissions to create and manage resources.
- Terraform installed on your local machine. You can download it from the official Terraform website and follow the installation instructions for your operating system.
Important : In this article, we will focus on the auto scaling group, so if you want to learn more about the vpc.tf, variables.tf, security_group.tf, route_table.tf, provider.tf, outputs.tf, loadbalancer.tf files, which will be created below, please refer to my previous article on Deploy WordPress on a 2-Tier AWS Architecture with Terraform, where I explain the role of all these files in more detail.
Step 1: Provider Configuration
Create a file named provider.tf with the following content:
provider "aws" {
  region = "ca-central-1"
}

terraform {
  required_providers {
    aws = {
      source  = "hashicorp/aws"
      version = "4.65.0"
    }
  }
}
Step 2: Network Configuration
Create a file named variables.tf whose content follows:
variable "inbound_ec2" {
  type        = list(any)
  default     = [22, 80]
  description = "inbound port allow on production instance"
}

variable "instance_type" {
  type    = string
  default = "t2.micro"
}

variable "ami" {
  type    = string
  default = "ami-0940df33750ae6e7f"
}

variable "key_name" {
  type    = string
  default = "ec2Key"
}

variable "availability_zone" {
  type    = list(string)
  default = ["ca-central-1a", "ca-central-1b"]
}

variable "vpc_cidr" {
  type    = string
  default = "10.0.0.0/16"
}

variable "subnet_cidrs" {
  type        = list(string)
  description = "list of all cidr for subnet"
  default     = ["10.0.1.0/24", "10.0.2.0/24"]
}
Create a file named vpc.tf with the content below:
resource "aws_vpc" "infrastructure_vpc" {
  cidr_block           = var.vpc_cidr
  enable_dns_support   = "true" # gives you an internal domain name
  enable_dns_hostnames = "true" # gives you an internal host name
  instance_tenancy     = "default"

  tags = {
    Name = "asg-vpc"
  }
}

# It enables our vpc to connect to the internet
resource "aws_internet_gateway" "infrastructure_igw" {
  vpc_id = aws_vpc.infrastructure_vpc.id
  tags = {
    Name = "asg-igw"
  }
}

# first public subnet
resource "aws_subnet" "first_public_subnet" {
  vpc_id                  = aws_vpc.infrastructure_vpc.id
  cidr_block              = var.subnet_cidrs[0]
  map_public_ip_on_launch = "true" // assigned a public IP address.
  availability_zone       = var.availability_zone[0]
  tags = {
    Name = "first public subnet"
  }
}

# second public subnet
resource "aws_subnet" "second_public_subnet" {
  vpc_id                  = aws_vpc.infrastructure_vpc.id
  cidr_block              = var.subnet_cidrs[1]
  map_public_ip_on_launch = "true" // assigned a public IP address.
  availability_zone       = var.availability_zone[1]
  tags = {
    Name = "second public subnet"
  }
}
Create a file named route_table.tf Here is the content:
resource "aws_route_table" "infrastructure_route_table" {
  vpc_id = aws_vpc.infrastructure_vpc.id

  route {
    //associated subnet can reach everywhere
    cidr_block = "0.0.0.0/0"
    //CRT uses this IGW to reach internet
    gateway_id = aws_internet_gateway.infrastructure_igw.id
  }

}

# attach first subnet to an internet gateway
resource "aws_route_table_association" "route-ec2-1-subnet-to-igw" {
  subnet_id      = aws_subnet.first_public_subnet.id
  route_table_id = aws_route_table.infrastructure_route_table.id
}

# attach second subnet to an internet gateway
resource "aws_route_table_association" "route-ec2-2-subnet-to-igw" {
  subnet_id      = aws_subnet.second_public_subnet.id
  route_table_id = aws_route_table.infrastructure_route_table.id
}
Step 3: Security Group Configuration
Create a file named security_group.tf below, you will find the content:
resource "aws_security_group" "instance_sg" {
  name = "asg-instance-sg"

  # Dynamic block that creates two rules to allow inbound traffic
  dynamic "ingress" {
    for_each = var.inbound_ec2
    content {
      from_port   = ingress.value
      to_port     = ingress.value
      protocol    = "tcp"
      cidr_blocks = ["0.0.0.0/0"]
    }
  }

  egress {
    from_port   = 0
    to_port     = 0
    protocol    = "-1"
    cidr_blocks = ["0.0.0.0/0"]
  }

  vpc_id = aws_vpc.infrastructure_vpc.id
}

resource "aws_security_group" "alb_sg" {
  name = "asg-alb-sg"
  ingress {
    from_port   = 80
    to_port     = 80
    protocol    = "tcp"
    cidr_blocks = ["0.0.0.0/0"]
  }

  egress {
    from_port   = 0
    to_port     = 0
    protocol    = "-1"
    cidr_blocks = ["0.0.0.0/0"]
  }

  vpc_id = aws_vpc.infrastructure_vpc.id
}
Step 4: Elastic Load Balancer Configuration
Create a file named loadbalancer.tf whose content follows:
resource "aws_lb" "alb" {
  name               = "asg-alb"
  internal           = false
  load_balancer_type = "application"
  security_groups    = [aws_security_group.alb_sg.id]
  subnets            = [aws_subnet.first_public_subnet.id, aws_subnet.second_public_subnet.id]
}

resource "aws_lb_listener" "alb_listener" {
  load_balancer_arn = aws_lb.alb.arn
  port              = "80"
  protocol          = "HTTP"

  default_action {
    type             = "forward"
    target_group_arn = aws_lb_target_group.alb_target_group.arn
  }
}

resource "aws_lb_target_group" "alb_target_group" {
  name     = "asg-target-group"
  port     = 80
  protocol = "HTTP"
  vpc_id   = aws_vpc.infrastructure_vpc.id
}
Step 5: Auto Scaling group
Create a file named main.tf with the content below:
resource "aws_launch_template" "instances_configuration" {
  name_prefix            = "asg-instance"
  image_id               = var.ami
  key_name               = var.key_name
  instance_type          = var.instance_type
  user_data              = filebase64("install_script.sh")
  vpc_security_group_ids = [aws_security_group.instance_sg.id]

  lifecycle {
    create_before_destroy = true
  }

  tags = {
    Name = "asg-instance"
  }

}

resource "aws_autoscaling_group" "asg" {
  name                      = "asg"
  min_size                  = 2
  max_size                  = 4
  desired_capacity          = 2
  health_check_grace_period = 150
  health_check_type         = "ELB"
  vpc_zone_identifier       = [aws_subnet.first_public_subnet.id, aws_subnet.second_public_subnet.id]
  launch_template {
    id      = aws_launch_template.instances_configuration.id
    version = "$Latest"
  }

}

resource "aws_autoscaling_policy" "avg_cpu_policy_greater" {
  name                   = "avg-cpu-policy-greater"
  policy_type            = "TargetTrackingScaling"
  autoscaling_group_name = aws_autoscaling_group.asg.id
  # CPU Utilization is above 50
  target_tracking_configuration {
    predefined_metric_specification {
      predefined_metric_type = "ASGAverageCPUUtilization"
    }
    target_value = 50.0
  }

}

resource "aws_autoscaling_attachment" "asg_attachment" {
  autoscaling_group_name = aws_autoscaling_group.asg.id
  lb_target_group_arn    = aws_lb_target_group.alb_target_group.arn
}
The resources defined in this file are:
- aws_launch_template “instances_configuration”: This resource defines a launch template that specifies the configuration for the EC2 instances launched by the Auto Scaling Group. It includes parameters such as the image ID, key name, instance type, user data script, and security group IDs. The launch template serves as a blueprint for creating instances within the Auto Scaling Group.
- aws_autoscaling_group “asg”: This resource configures the Auto Scaling Group. It defines the group’s name, minimum and maximum number of instances, desired capacity, health check settings, and the VPC subnets where instances will be launched. It references the previously defined launch template to specify the instance configuration.
- aws_autoscaling_policy “avg_cpu_policy_greater”: This resource creates an Auto Scaling policy that adjusts the capacity of the Auto Scaling Group based on CPU utilization. In this example, the policy is set to target tracking scaling with a target value of 50% CPU utilization. It ensures that the Auto Scaling Group maintains the desired CPU utilization by scaling the number of instances up or down accordingly.
- aws_autoscaling_attachment “asg_attachment”: This resource attaches the Auto Scaling Group to a Load Balancer target group. It specifies the ASG and the ARN of the target group, allowing the instances launched by the ASG to receive traffic from the Load Balancer.
Role: All these resources work together in a comprehensive Auto Scaling architecture. The launch template provides a centralized configuration template for the EC2 instances, ensuring consistent deployment and reproducibility. The Auto Scaling Group utilizes the launch template to create and manage the desired number of instances, automatically scaling the infrastructure based on demand. The Auto Scaling policy adds an additional layer of intelligence by dynamically adjusting the capacity of the Auto Scaling Group based on CPU utilization. This helps maintain optimal performance and resource utilization. Finally, the attachment of the Auto Scaling Group to the Load Balancer target group allows for effective traffic distribution, improving the availability and responsiveness of the application. Together, these components enable a scalable, resilient, and efficient infrastructure for handling varying workloads.
Create a file named install_script.sh with the following content:
#!/bin/bash
sudo apt-get update
sudo apt-get install nginx -y
sudo systemctl enable nginx
sudo systemctl start nginx
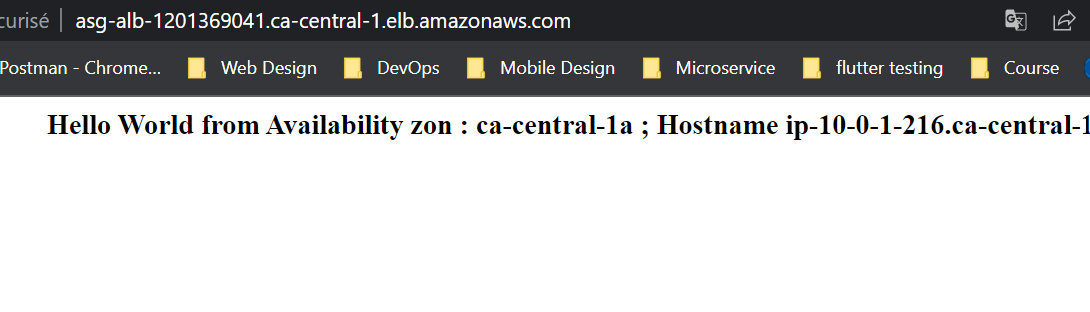
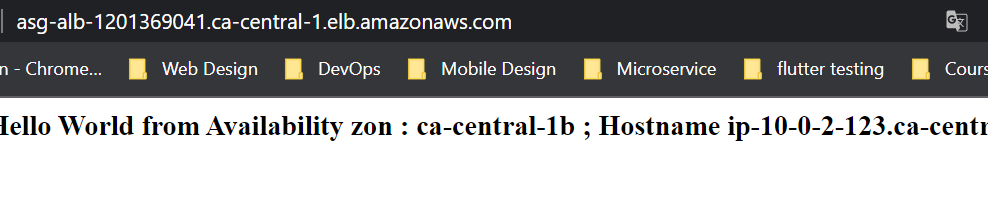
EC2_AVAIL_ZONE=`curl -s http://169.254.169.254/latest/meta-data/placement/availability-zone`
echo " Hello World from Availability zone : $EC2_AVAIL_ZONE ; Hostname $(hostname -f)
" > /var/www/html/index.html
sudo apt install stress -yThe install_script.sh file is a Bash script that contains a series of commands to be executed on the EC2 instances when they are launched. A script that updates the package repository, installs Nginx, configures it to start on boot, and starts the service. It then Retrieves the availability zone of the EC2 instance using the instance metadata service and Creates an HTML file with a customized message that includes the availability zone and hostname of the EC2 instance. The file is saved in the default Nginx web server document root directory. And finaly installs the stress testing tool, which can be used to simulate high CPU usage on the EC2 instance.
Create a file named outputs.tf here is the content:
output "application_endpoint" {
  value = aws_lb.alb.dns_name
}
Step 6: Deployment
To start the deployment process, we need to initialize Terraform in our project directory. This step ensures that Terraform downloads the necessary providers and sets up the backend configuration. Run the following command in your terminal:
terraform init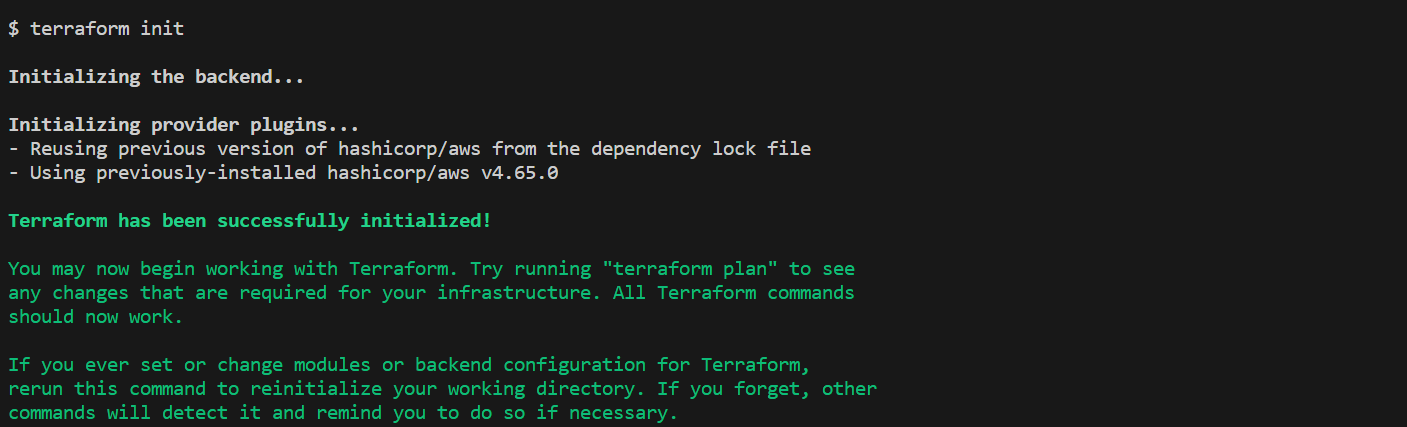
After initializing Terraform, we can generate an execution plan to preview the changes that will be made to our AWS infrastructure. The plan provides a detailed overview of the resources that will be created, modified, or destroyed.
To generate the plan, execute the following command:
terraform plan
Once we are satisfied with the execution plan, we can proceed with deploying our infrastructure on AWS. Terraform will provide the necessary resources and configure them according to our specifications.
To deploy the infrastructure, run the following command:
terraform applyTerraform will prompt for confirmation before proceeding with the deployment. Type yes and press Enter to continue.
The deployment process will take some time. Terraform will display the progress and status of each resource being created.
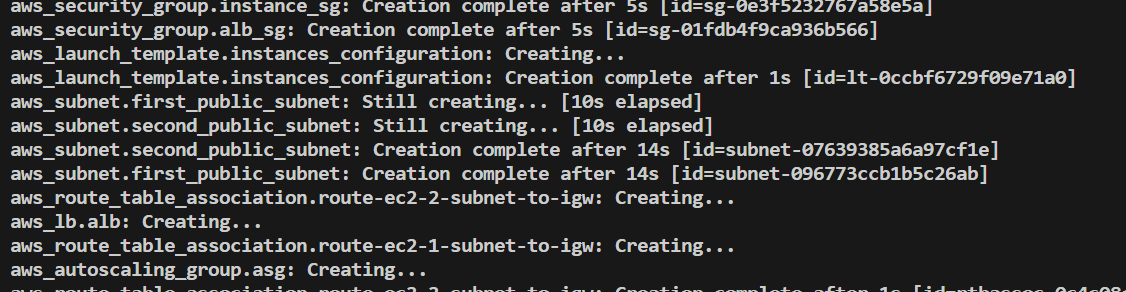
Once the deployment is complete, Terraform will output the application load balancer dns name.
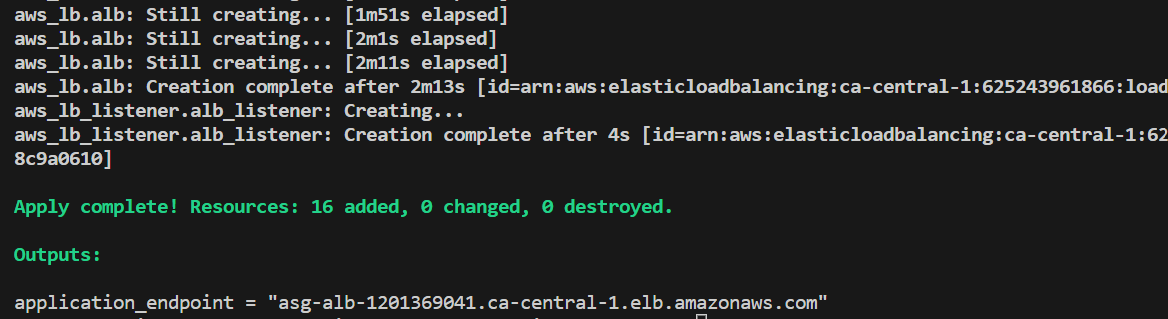
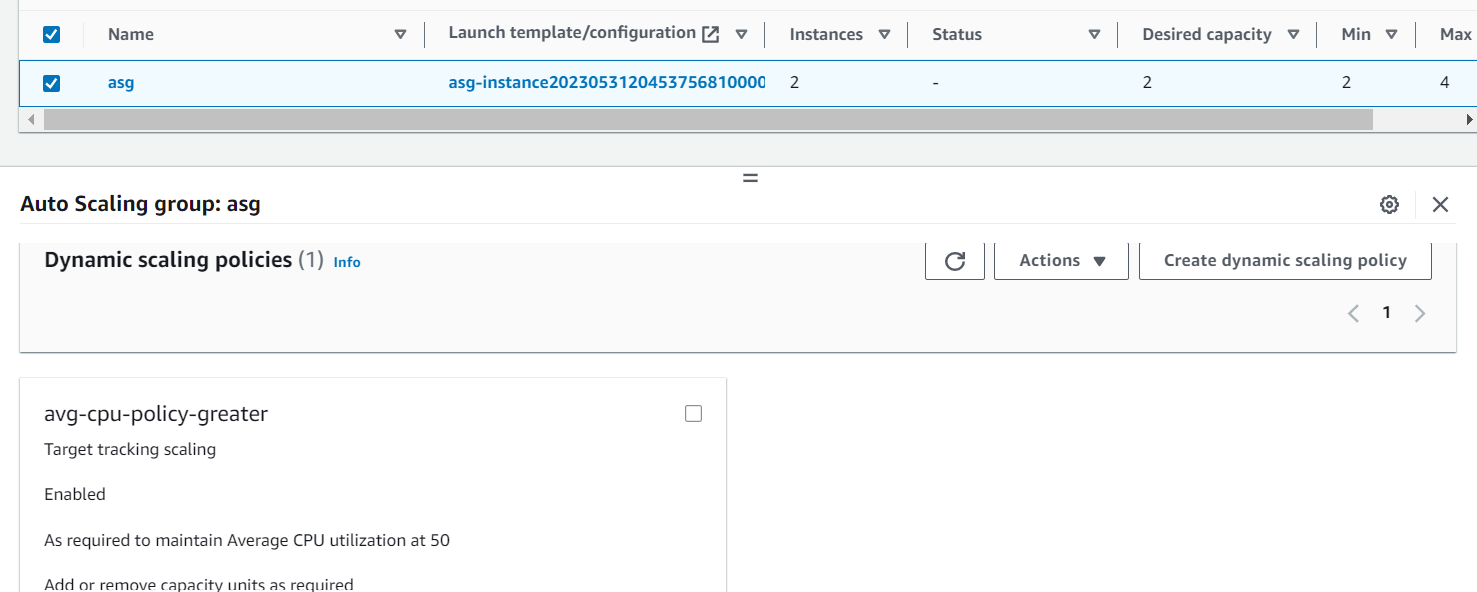
Finally, let’s check our infrastructure from the AWS Console:

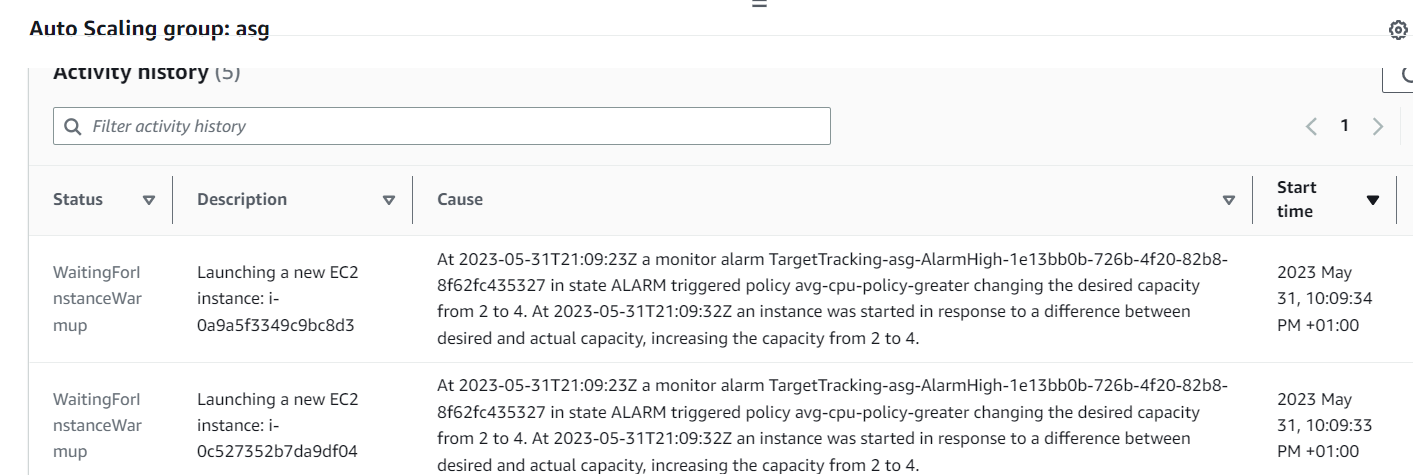
Now that our infrastructure is ready, let’s test our Auto Scaling Group to see if it works as expected. To do this, connect via ssh to one of the two instances and type the command below:
stress -c 8
Then wait a few minutes and you’ll get the results below, of a new instance created by the Auto Scaling group.

The complete source code of the project is available on GitHub.
———————
We have just started our journey to build a network of professionals to grow even more our free knowledge-sharing community that’ll give you a chance to learn interesting things about topics like cloud computing, software development, and software architectures while keeping the door open to more opportunities.
Does this speak to you? If YES, feel free to Join our Discord Server to stay in touch with the community and be part of independently organized events.
———————
Conclusion
To conclude, implementing an Auto Scaling Group on AWS with Terraform provides a flexible and efficient solution for managing application scalability. By leveraging Terraform’s infrastructure-as-code capabilities, teams can easily handle workload fluctuations and optimize performance. Thorough research and careful configuration are crucial for achieving optimal results. Regular monitoring and adjustments ensure high availability and cost-effectiveness. Deploying an Auto Scaling Group with Terraform empowers teams to scale resources, improve performance, and leverage AWS’s elastic infrastructure.
Thanks for reading this article, recommend and share if you enjoyed it. Follow us on Facebook, Twitter, and LinkedIn for more content.
Leave a Reply