
Migrating Auto Scaling Group from IPv4 to IPv6 on AWS with Terraform
Introduction
With the exponential growth of Internet-connected devices, IPv4 addresses are becoming increasingly scarce. IPv6, with its vast address space, has become essential to support this expansion. Migrating to IPv6 not only offers better IP address management but also provides advantages in terms of security, efficiency, and network performance. In this article, we will guide you through the process of migrating an Auto Scaling Group from IPv4 to IPv6 using Terraform, an Infrastructure as Code (IaC) tool that simplifies cloud infrastructure management.
Prerequisites
Before starting the migration of your Auto Scaling Group (ASG) from IPv4 to IPv6 using Terraform, make sure you have:
- An AWS account with the necessary permissions to manage AWS resources.
- Terraform installed on your local machine. You can download it from the official Terraform website and follow the installation instructions for your operating system.
- A basic understanding of Terraform and AWS services, such as VPC, EC2 and Auto Scaling.
Understanding IPv6
Explanation of IPv6 and Its Advantages
IPv6 (Internet Protocol version 6) is the latest version of the Internet Protocol, designed to replace IPv4 (Internet Protocol version 4). One of the main differences between the two versions is the size of the address space. IPv6 uses 128-bit addresses, allowing for an almost unlimited number of unique IP addresses (approximately 340 undecillion), compared to the 4.3 billion possible addresses with IPv4.
The advantages of IPv6 include:
- Expanded address space: Allows for the connection of many new devices.
- Auto-configuration: Simplifies the process of assigning IP addresses.
- Better security: Integrates IPsec (Internet Protocol Security) for secure communication.
- Improved performance: Reduces routing complexity and enhances overall network efficiency.
Comparison Between IPv4 and IPv6
Here are some key differences between IPv4 and IPv6:
| Feature | IPv4 | IPv6 |
|---|---|---|
| Address Length | 32 bits | 128 bits |
| Number of Addresses | ~4.3 billion | ~340 undecillion |
| Address Format | Decimal (e.g., 192.168.1.1) | Hexadecimal (e.g., 2001:0db8::1) |
| Configuration | Manual or DHCP | Stateless auto-configuration |
| Security | Optional | Integrated with IPsec |
| Header | Simple and less flexible | Complex and extensible |
Current Setup Overview
Before diving into the process of migrating to IPv6, let’s briefly review the structure of our existing Auto Scaling Group (ASG) configured with Terraform and based on IPv4. This configuration was detailed in our previous article: Auto Scaling Group on AWS with Terraform.
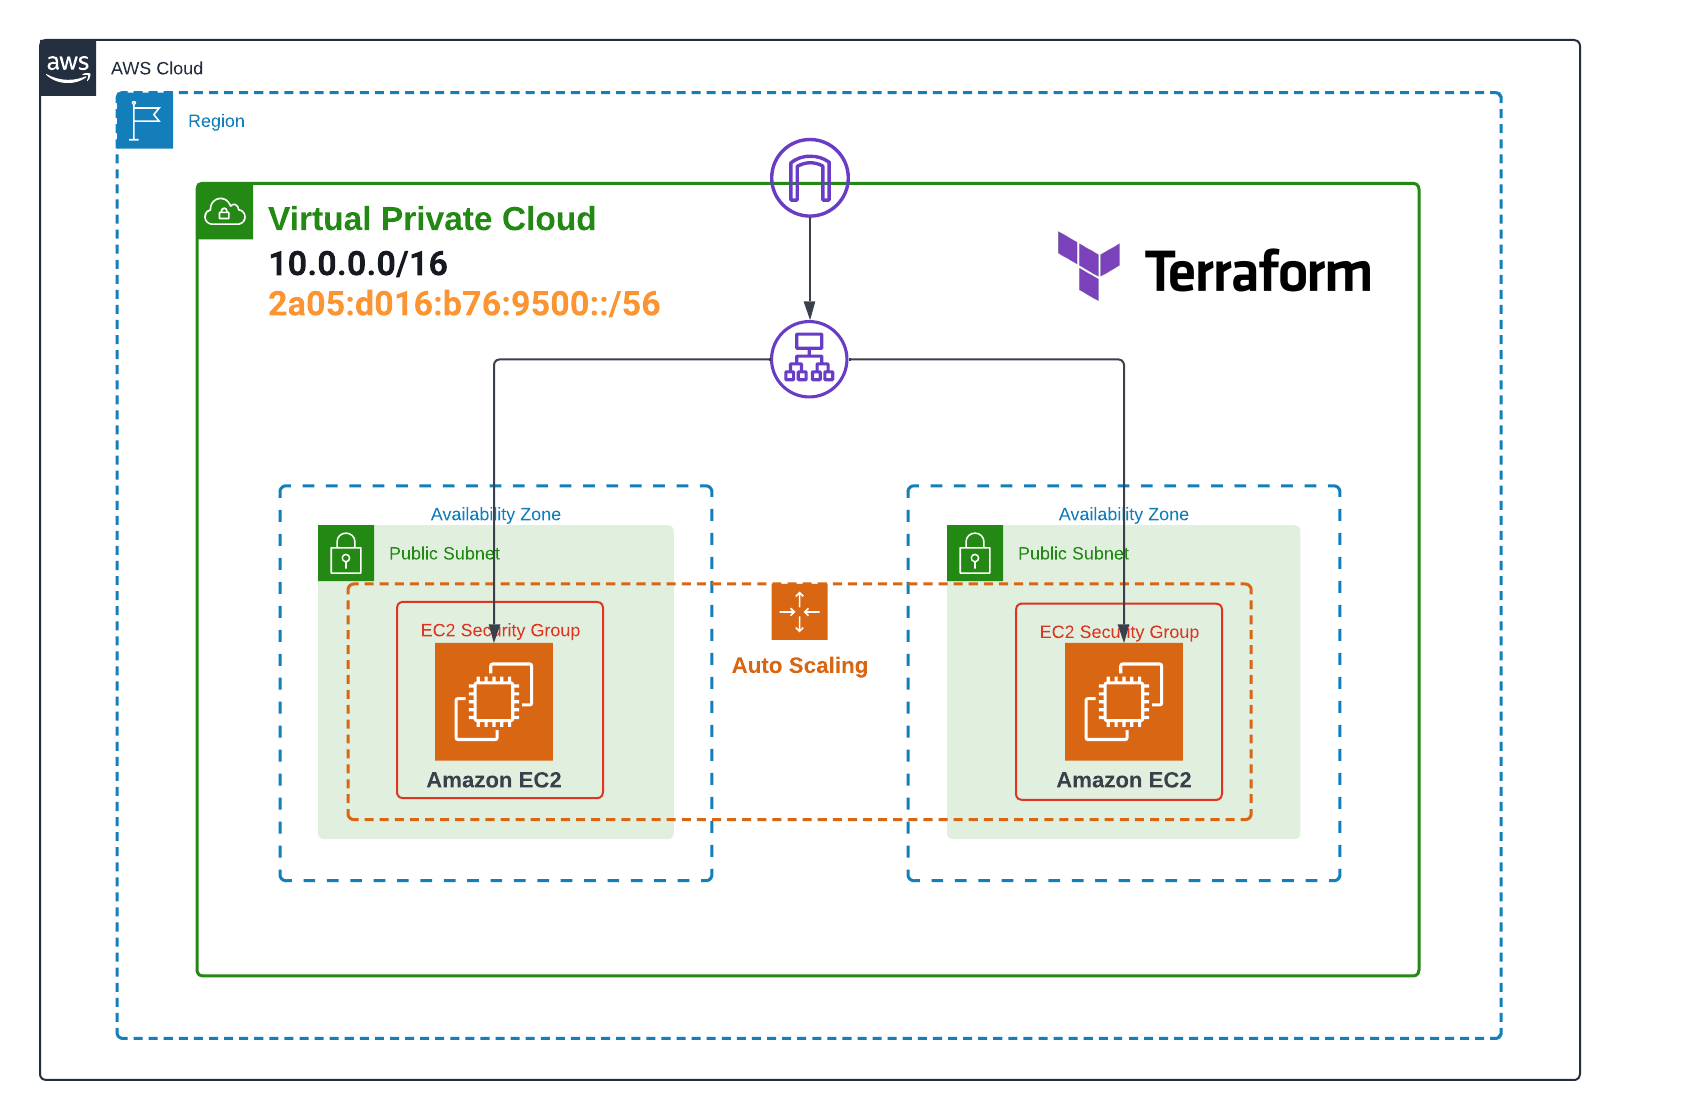
Our current infrastructure consists of the following key elements:
-
VPC (Virtual Private Cloud): A virtual network isolated in the AWS cloud, configured with an IPv4 CIDR block (10.0.0.0/16).
-
Subnets: Two public subnets spread across different availability zones, each with its own IPv4 CIDR block (10.0.1.0/24 and 10.0.2.0/24).
-
Security Groups: Two distinct security groups:
- One for the EC2 instances, allowing inbound traffic on ports 22 (SSH) and 80 (HTTP).
- One for the Application Load Balancer (ALB), allowing inbound HTTP traffic on port 80.
-
Application Load Balancer (ALB): A load balancer that distributes incoming traffic among the EC2 instances in the ASG.
-
Auto Scaling Group: Configured to maintain between 2 and 4 EC2 instances, with a desired capacity of 2 instances.
- Launch Template: Defines the configuration of the EC2 instances launched by the ASG, including the AMI, instance type, and an initialization script to install and configure Nginx.
Step-by-Step Migration Process
Step 1: Updating the VPC and Subnets
The first step in our migration to IPv6 is to modify our existing VPC and subnets to support the new protocol. We will proceed in two parts: first updating the VPC, then the subnets.
Modifying the VPC Configuration
To enable IPv6 on our VPC, we need to add a few attributes to our aws_vpc resource. Here are the changes to make in the vpc.tf file:
resource "aws_vpc" "infrastructure_vpc" {
cidr_block = var.vpc_cidr
assign_generated_ipv6_cidr_block = true
enable_dns_support = true
enable_dns_hostnames = true
instance_tenancy = "default"
tags = {
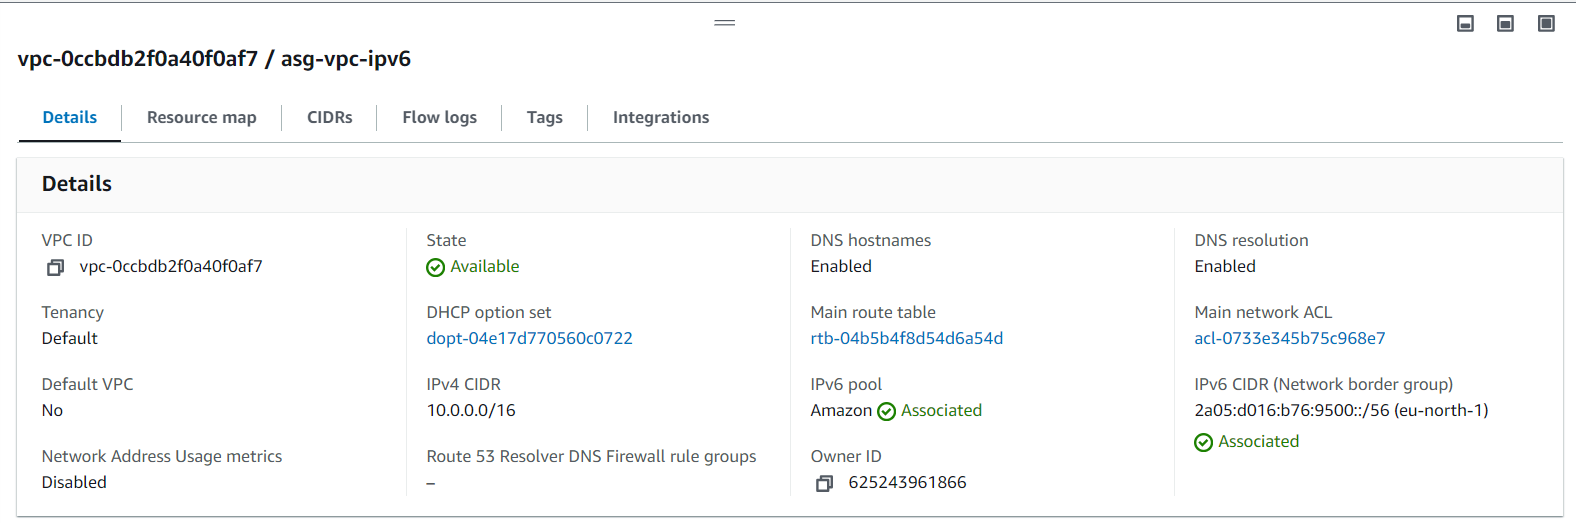
Name = "asg-vpc-ipv6"
}
}The key changes are:
assign_generated_ipv6_cidr_block = true: This line requests AWS to automatically assign an IPv6 CIDR block to our VPC.
Updating the Existing Subnets
Next, we need to update our subnets to include IPv6 CIDR blocks. Modify the aws_subnet resources in the vpc.tf file as follows:
resource "aws_subnet" "first_public_subnet" {
  vpc_id                          = aws_vpc.infrastructure_vpc.id
  cidr_block                      = var.subnet_cidrs[0]
  ipv6_cidr_block                 = cidrsubnet(aws_vpc.infrastructure_vpc.ipv6_cidr_block, 8, 1)
  map_public_ip_on_launch         = true
  assign_ipv6_address_on_creation = true
  availability_zone               = var.availability_zone[0]

  tags = {
    Name = "first public subnet ipv6"
  }
}

resource "aws_subnet" "second_public_subnet" {
  vpc_id                          = aws_vpc.infrastructure_vpc.id
  cidr_block                      = var.subnet_cidrs[1]
  ipv6_cidr_block                 = cidrsubnet(aws_vpc.infrastructure_vpc.ipv6_cidr_block, 8, 2)
  map_public_ip_on_launch         = true
  assign_ipv6_address_on_creation = true
  availability_zone               = var.availability_zone[1]

  tags = {
    Name = "second public subnet ipv6"
  }
}
The important modifications are:
ipv6_cidr_block = cidrsubnet(aws_vpc.infrastructure_vpc.ipv6_cidr_block, 8, 1): This line assigns an IPv6 CIDR block to the subnet. Thecidrsubnetfunction creates a subnet from the VPC’s IPv6 CIDR block.assign_ipv6_address_on_creation = true: This ensures that instances launched in this subnet will automatically receive an IPv6 address.
Step 2: Updating the Security Groups
After configuring our VPC and subnets for IPv6, the next step is to update our security groups to allow IPv6 traffic. We need to modify the inbound and outbound rules to ensure our infrastructure can communicate via IPv6.
Open the security_group.tf file and make the following changes:
resource "aws_security_group" "instance_sg" {
  name   = "asg-instance-sg-ipv6"
  vpc_id = aws_vpc.infrastructure_vpc.id

  dynamic "ingress" {
    for_each = var.inbound_ec2
    content {
      from_port        = ingress.value
      to_port          = ingress.value
      protocol         = "tcp"
      cidr_blocks      = ["0.0.0.0/0"]
      ipv6_cidr_blocks = ["::/0"]
    }
  }

  egress {
    from_port        = 0
    to_port          = 0
    protocol         = "-1"
    cidr_blocks      = ["0.0.0.0/0"]
    ipv6_cidr_blocks = ["::/0"]
  }

  tags = {
    Name = "instance-sg-ipv6"
  }
}

resource "aws_security_group" "alb_sg" {
  name   = "asg-alb-sg-ipv6"
  vpc_id = aws_vpc.infrastructure_vpc.id

  ingress {
    from_port        = 80
    to_port          = 80
    protocol         = "tcp"
    cidr_blocks      = ["0.0.0.0/0"]
    ipv6_cidr_blocks = ["::/0"]
  }

  egress {
    from_port        = 0
    to_port          = 0
    protocol         = "-1"
    cidr_blocks      = ["0.0.0.0/0"]
    ipv6_cidr_blocks = ["::/0"]
  }

  tags = {
    Name = "alb-sg-ipv6"
  }
}
The main changes are:
-
For the instance security group (
instance_sg):- Adding
ipv6_cidr_blocks = ["::/0"]to the dynamic ingress rule to allow incoming IPv6 traffic on the specified ports. - Adding
ipv6_cidr_blocks = ["::/0"]to the egress rule to allow all outgoing IPv6 traffic.
- Adding
- For the Load Balancer security group (
alb_sg):- Adding
ipv6_cidr_blocks = ["::/0"]to the ingress rule to allow incoming HTTP IPv6 traffic on port 80. - Adding
ipv6_cidr_blocks = ["::/0"]to the egress rule to allow all outgoing IPv6 traffic.
- Adding
These changes allow our security groups to permit IPv6 traffic in the same way they permit existing IPv4 traffic. Using ::/0 as the IPv6 CIDR block is equivalent to 0.0.0.0/0 in IPv4, allowing all IPv6 traffic.
Step 3: Updating the Route Tables
After configuring our security groups for IPv6, we need to update our route tables to properly handle IPv6 traffic. Open the route_table.tf file and make the following changes:
resource "aws_route_table" "infrastructure_route_table" {
  vpc_id = aws_vpc.infrastructure_vpc.id

  route {
    cidr_block = "0.0.0.0/0"
    gateway_id = aws_internet_gateway.infrastructure_igw.id
  }

  route {
    ipv6_cidr_block = "::/0"
    gateway_id      = aws_internet_gateway.infrastructure_igw.id
  }

  tags = {
    Name = "asg-route-table-ipv6"
  }
}

resource "aws_route_table_association" "route-ec2-1-subnet-to-igw" {
  subnet_id      = aws_subnet.first_public_subnet.id
  route_table_id = aws_route_table.infrastructure_route_table.id
}

resource "aws_route_table_association" "route-ec2-2-subnet-to-igw" {
  subnet_id      = aws_subnet.second_public_subnet.id
  route_table_id = aws_route_table.infrastructure_route_table.id
}
The main changes are:
- Adding a new route for IPv6 traffic in the route table:
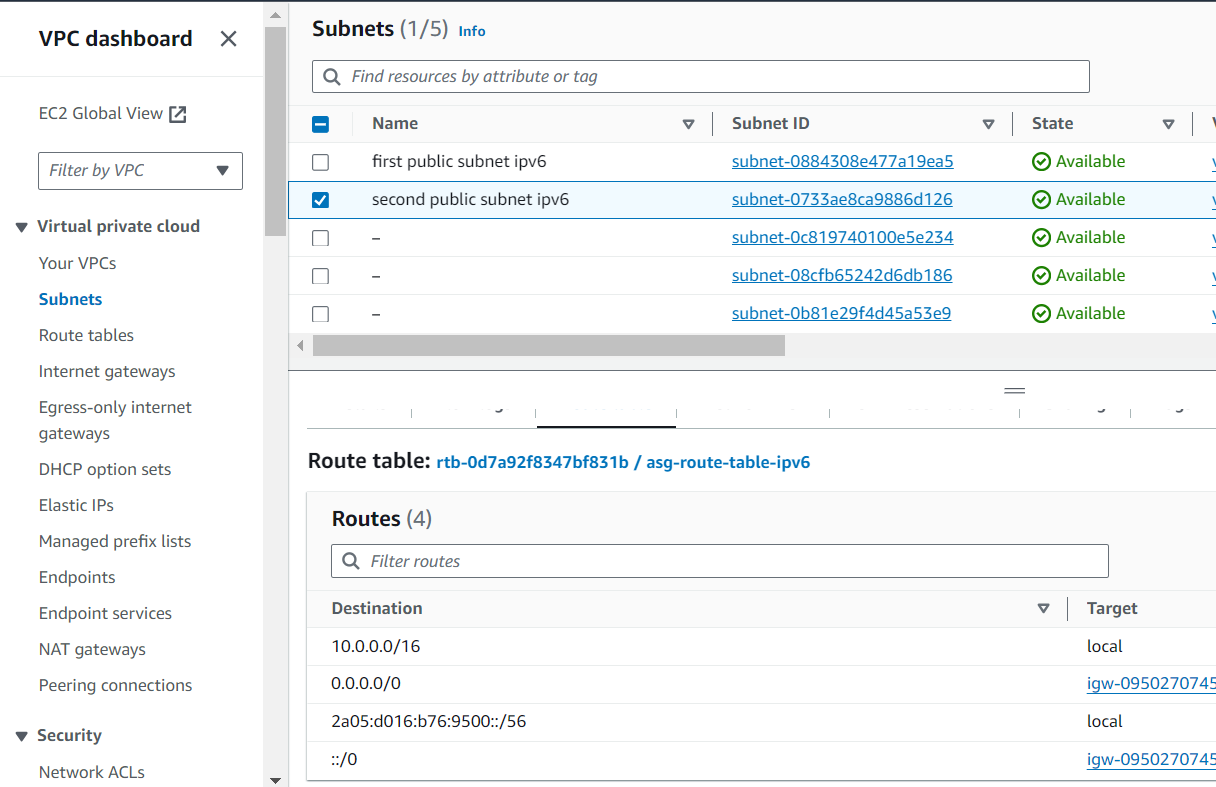
route {
 ipv6_cidr_block = "::/0"
 gateway_id      = aws_internet_gateway.infrastructure_igw.id
}
This route directs all IPv6 traffic to the internet gateway, allowing instances to communicate via IPv6 with the internet.
The route table associations remain unchanged as they apply to both IPv4 and IPv6 traffic.
Step 4: Updating the Elastic Load Balancer (ELB)
Next, we will modify our Application Load Balancer (ALB) to support IPv6. Open the loadbalancer.tf file and make the following changes:
resource "aws_lb" "alb" {
  name               = "asg-alb-ipv6"
  internal           = false
  load_balancer_type = "application"
  security_groups    = [aws_security_group.alb_sg.id]
  subnets            = [aws_subnet.first_public_subnet.id, aws_subnet.second_public_subnet.id]

  ip_address_type = "dualstack"

  tags = {
    Name = "asg-alb-ipv6"
  }
}

resource "aws_lb_listener" "alb_listener" {
  load_balancer_arn = aws_lb.alb.arn
  port              = "80"
  protocol          = "HTTP"

  default_action {
    type             = "forward"
    target_group_arn = aws_lb_target_group.alb_target_group.arn
  }
}

resource "aws_lb_target_group" "alb_target_group" {
  name        = "asg-target-group-ipv6"
  port        = 80
  protocol    = "HTTP"
  vpc_id      = aws_vpc.infrastructure_vpc.id
  target_type = "instance"

  health_check {
    path                = "/"
    healthy_threshold   = 2
    unhealthy_threshold = 10
    timeout             = 5
    interval            = 30
    matcher             = "200"
  }

  tags = {
    Name = "asg-target-group-ipv6"
  }
}
The main changes are:
-
In the
aws_lbresource:- Adding
ip_address_type = "dualstack"to enable the ALB to operate with both IPv4 and IPv6. - Updating the name and tags to reflect IPv6 support.
- Adding
- In the
aws_lb_target_groupresource:- Adding
target_type = "ip"to use IP addresses as targets instead of instances. - Adding
ip_address_type = "ipv6"to specify that this target group will use IPv6 addresses. - Updating the name and tags to reflect IPv6 support.
- Adding
These changes enable our ALB to handle IPv6 traffic and route it to our EC2 instances using their IPv6 addresses.
Step 5: Updating Launch Templates and Auto Scaling Group
The final step of our migration is to update our Launch Template and Auto Scaling Group (ASG) to support IPv6. Open the main.tf file and make the following changes:
resource "aws_launch_template" "instances_configuration" {
name_prefix = "asg-instance-ipv6"
image_id = var.ami
instance_type = var.instance_type
key_name = var.key_name
network_interfaces {
associate_public_ip_address = true
security_groups = [aws_security_group.instance_sg.id]
delete_on_termination = true
ipv6_address_count = 1
}
user_data = base64encode(<<-EOF
#!/bin/bash
apt-get update
apt-get install -y nginx
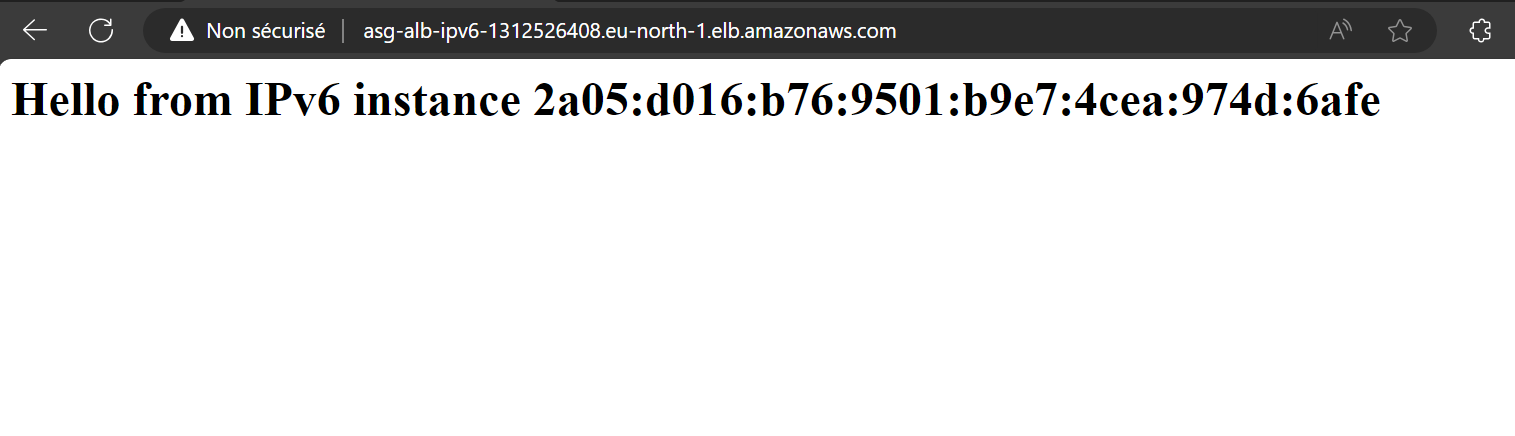
echo "<h1>Hello from IPv6 instance $(curl -s http://169.254.169.254/latest/meta-data/local-ipv6)</h1>" > /var/www/html/index.html
systemctl start nginx
systemctl enable nginx
EOF
)
tag_specifications {
resource_type = "instance"
tags = {
Name = "asg-instance-ipv6"
}
}
}
resource "aws_autoscaling_group" "asg" {
name = "asg-ipv6"
vpc_zone_identifier = [aws_subnet.first_public_subnet.id, aws_subnet.second_public_subnet.id]
target_group_arns = [aws_lb_target_group.alb_target_group.arn]
health_check_type = "ELB"
min_size = 2
max_size = 4
desired_capacity = 2
launch_template {
id = aws_launch_template.instances_configuration.id
version = "$Latest"
}
tag {
key = "Name"
value = "asg-instance-ipv6"
propagate_at_launch = true
}
}Key modifications include:
-
In the Launch Template (
aws_launch_template):- Added
network_interfacesconfiguration to specifyipv6_address_count = 1, assigning an IPv6 address to each instance. - Updated
user_datascript to display the instance’s IPv6 address.
- Added
- In the Auto Scaling Group (
aws_autoscaling_group):- Updated the name to reflect IPv6 support.
- Used
target_group_arnsto associate the ASG with the IPv6 ALB target group.
These changes enable our infrastructure to utilize IPv6 addresses effectively, ensuring compatibility and functionality across the deployment.
Finally, let’s check our infrastructure from the AWS Console:

Conclusion
The migration to IPv6 with Terraform represents a crucial step in optimizing cloud infrastructure while meeting growing connectivity and security needs. By adopting IPv6, organizations benefit from expanded address space and enhance the resilience of their systems. This guide has demonstrated how Terraform simplifies this transition, providing an efficient and scalable approach to managing Auto Scaling Groups while ensuring optimal network performance.
Leave a Reply